AlmaLinux OS - Samba File Server
Many of you requested more articles about self-hosting and home servers. One of the major use cases is making files available for others in the network. This might be useful to share projects, but also for backups or filling your media library.

Many of you requested more articles about self-hosting and home servers. One of the major use cases is making files available for others in the network. This might be useful to share projects, but also for backups or filling your media library.
Don't worry. Setting up a Samba file server is easy and done quickly, even without disabling the firewall or SELinux.
AlmaLinux OS
AlmaLinux OS is my preferred Enterprise Linux for personal use. It is based on CentOS Stream, yet provides a stabilized and versioned approach. It is meant to be ABI compatible to Red Hat Enterprise Linux.
For me, it became the best OS when it comes to small office/home office use cases, but also for development and uncritical environments in large enterprise. Therefore, I already published a couple of articles related to AlmaLinux OS.
Samba
Samba is one of the older open source software implementations. In general, it stands for "opening windows for the wider world". Therefore, I am seeing it as the glue between Windows and Linux environments. This does not mean, you need to use Windows to make use of Samba.
For the sake of this tutorial, I will focus on the Samba file server capabilities. Meaning, we will provide so-called CIFS (Common Internet File System) shares. Yet, Samba can also provide an LDAP server or act as a proxy for the same and much more.
Project
Let's make our small project somewhat realistic.
As the owner of my home network, I want to share documents between me and family. All family members (Alice, Bob and Carol) should be allowed to upload and download data on a share, no matter if they use Linux or Windows on their workstation.
Pretty simple, right? And this can be solved with the Samba file server easily.
Setup
Finally, we came to the part where some work is done. Let's set this baby up.
Pre-Requisites
Before going forward, there are some things you should ensure.
- update the system beforehand
- ensure that the machine has a proper time/NTP setup
- ensure that the machine has proper DNS settings (meaning it can resolve DNS records or has no DNS resolution configured at all)
- ensure that you have enough space in
/var/lib/samba/or another desired location for your shares available
There are ways to work around all of the above, but for this tutorial, I assume you have solved them already.
Package installation
Yes, this guide does not start with disabling SELinux. Instead, just let's install some packages. The command should be pretty straight forward.
# Install Samba packages
$ sudo dnf install samba
Optionally, you can also install the samba-tools package for a more convenient and sophisticated administration command. For this guide, it is not needed.
Configuration
The configuration of Samba can be done in a single file. All Red Hat family distributions also deliver a default configuration and a fully commented example file.
# Show configuration files

$ ls -la /etc/samba/
total 32
drwxr-xr-x.  2 root root    61 May 19 06:34 .
drwxr-xr-x. 99 root root  8192 May 19 06:50 ..
-rw-r--r--.  1 root root    20 Apr  4 20:31 lmhosts
-rw-r--r--.  1 root root   853 Apr  4 20:31 smb.conf
-rw-r--r--.  1 root root 11319 Apr  4 20:31 smb.conf.example
We are interested in the smb.conf file for now. But it is strongly recommended to consult the smb.conf.example file, in case you want to tune the configuration later on. In my case, the smb.conf file will look like this:
[global]
        workgroup = SAMBA
        security = user

        passdb backend = tdbsam

        printing = cups
        printcap name = cups
        load printers = No
        cups options = raw

[family]
        comment = Family Share
        path = /var/lib/samba/shares/family
        valid users = @family
        create mode = 0660
        directory mode = 0770
        browseable = Yes
        read only = No
/etc/samba/smb.conf
As you can see, I have disabled the printers, homes and all related sections, but also added a [family] section. The [homes], [globals] and [printers] section are special for samba. Every other section can be configured as you like.
In the above, I configured a single share, which can be accessed from the members of the family group.
To test your configuration, you can use the testparm command. It will tell you if you have an option written or used in the wrong way or used a value that is not supported. Yet, it will not test if your configuration does what you want.
# Run testparm
$ testparm
Load smb config files from /etc/samba/smb.conf
Loaded services file OK.
Weak crypto is allowed by GnuTLS (e.g. NTLM as a compatibility fallback)

Server role: ROLE_STANDALONE

Press enter to see a dump of your service definitions
User creation
Now that we have a valid configuration, we intend to use, we also need to create the users and tell Samba to actually use them. This part is often the most confusing one. We need to have a local user, so we can manage groups and permissions on the filesystem. But we also need a password/user combination to allow these users to log in to the Samba file server.
This might sound complicated, but in reality it is not.
For a small home setup, I will stick with a local user, which will make it easy to create these. The following commands will create our desired local Linux users and groups. The users will be created in a way, so that they do have a home directory, but are not allowed to log in on the console or via SSH.
# Create the users
$ sudo useradd alice --create-home --shell /usr/sbin/nologin
$ sudo useradd bob --create-home --shell /usr/sbin/nologin
$ sudo useradd carol --create-home --shell /usr/sbin/nologin

# Set passwords for users (even though they cannot log in)
$ sudo passwd alice
$ sudo passwd bob
$ sudo passwd carol

# Create the family group
$ sudo groupadd family

# Add users to the group
$ sudo usermod -aG family alice
$ sudo usermod -aG family bob
$ sudo usermod -aG family carol
Next, we need to add the users to the Samba database.
# Create Samba users
$ smbpasswd -a alice
$ smbpasswd -a bob
$ smbpasswd -a carol

# Check if users exist in Samba
$ sudo pdbedit -L
alice:1001:
carol:1003:
bob:1002:
And, that's it. Let's head to the next section.
Directory creation
As per our configuration, we want to share the /var/lib/samba/shares/family directory. To do so, we have to create it.
# Create directory
$ sudo mkdir -p /var/lib/samba/shares/family
We also need to set permissions for our new group.
# Change group ownership to "family"
$ sudo chown root:family /var/lib/samba/shares/family

# Allow writing for root and group only
$ sudo chmod 0770 /var/lib/samba/shares/family

# Check permissions
$ sudo ls -ld /var/lib/samba/shares/family/
drwxrwx---. 3 root family 17 May 19 16:10 /var/lib/samba/shares/family/
This should do the trick, mostly.
SELinux considerations
But wait … or maybe … feel free to continue to the guide and come back to this section. In Red Hat family systems, you will find SELinux enabled. Therefore, the above directory is not working as designed. It might not even work at all. So, let's make a little exercise here. First, we want to check if SELinux is enabled.
$ getenforce
Enforcing
Looking good. Next, we need to understand that SELinux works with context types on a file level. Meaning, each file and directory has a designed context type, which allows programs to access directories only, if they are meant to access it.
We can check this for our directory.
$ ls -ldZ /var/lib/samba/shares/
drwxr-xr-x. 3 root root unconfined_u:object_r:samba_var_t:s0 20 May 19 12:53 /var/lib/samba/shares/

$ ls -ldZ /var/lib/samba/shares/family/
drwxrwxr-x. 2 root family unconfined_u:object_r:samba_var_t:s0 6 May 19 12:53 /var/lib/samba/shares/family/
The context currently in use is "samba_var_t". Yet, Samba requires us to use the context "samba_share_t". This is also mentioned in the discussed smb.conf.example file from above and the command man smb.conf. To permanently set the context, we require a command (what else?).
# Configure file context
$ sudo semanage fcontext --add --type samba_share_t /var/lib/samba/shares
$ sudo semanage fcontext --add --type samba_share_t /var/lib/samba/shares/*
This will make the change persistent, but the semanage command does not "enable" these changes on the fly. Instead, a second command is needed.
# Enable/Restore the configure contexts
$ sudo restorecon -R /var/lib/samba/shares
And that's it. Checking our files again, we can see the context.
# Check the shares
$ ls -ldZ /var/lib/samba/shares/family/
drwxrwxr-x. 2 root family unconfined_u:object_r:samba_share_t:s0 6 May 19 12:53 /var/lib/samba/shares/family/
And yes, you also need to this, if your desired location is located in the /samba, /srv/shares or wherever you desire to have them.
Services
Finally, we can start the services. This will start Samba, read our configuration and basically make Samba available.
# Start & enable Samba and Netbios
$ sudo systemctl enable --now smb.service
$ sudo systemctl enable --now nmb.service
In case you don't have a firewall enabled on your (which may be a bad idea), you are done here. Everything should work as expected.
Firewall
In case you have the firewalld daemon enabled, you require one more step to complete the setup.
# Allow Samba traffic
$ sudo firewall-cmd --add-service samba
$ sudo firewall-cmd --add-service samba --permanent
And now we are done.
Testing
For testing purposes, you can use lots of tools. One of them is the smbclient command line utility. It is in the samba-client package.
# Check what is available for alice
$ smbclient -U SAMBA/alice -L //localhost
Password for [SAMBA\alice]:

	Sharename       Type      Comment
	---------       ----      -------
	family          Disk      Family Share
	IPC$            IPC       IPC Service (Samba 4.19.4)
SMB1 disabled -- no workgroup available
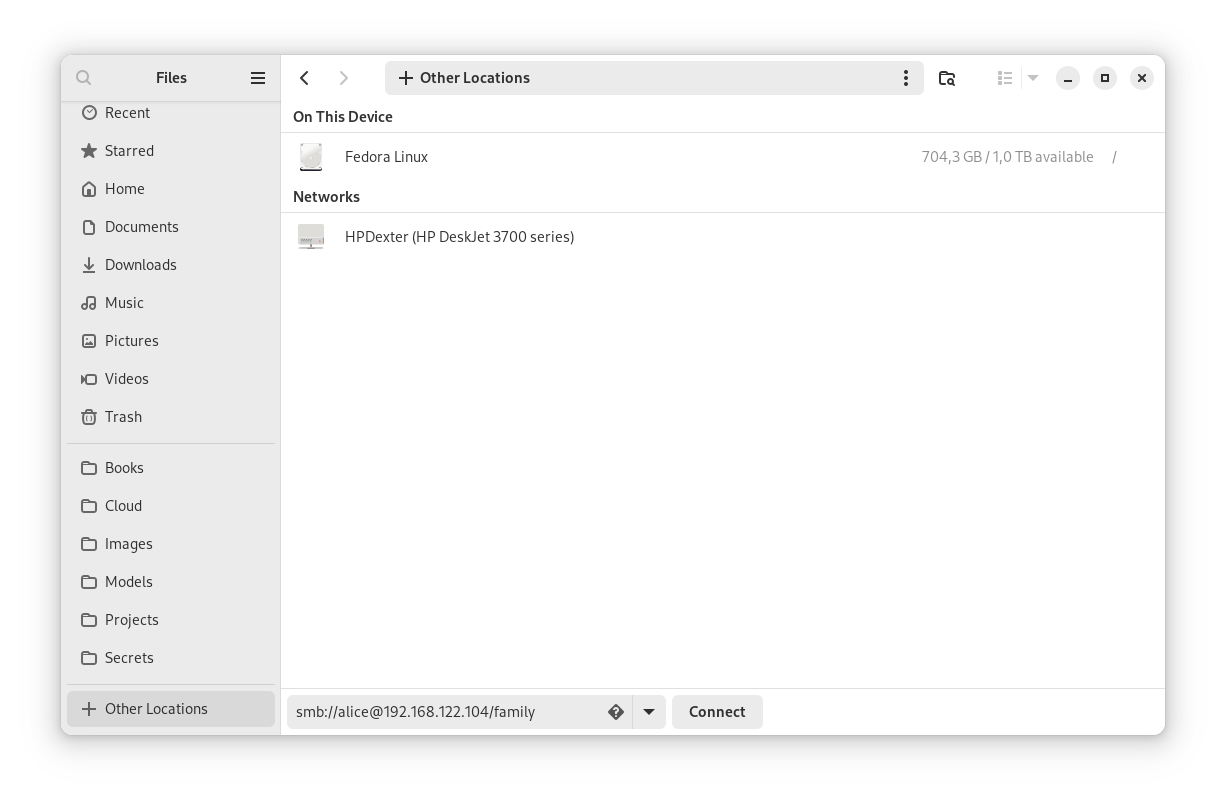
But, you can also use the Nautilus file manager to mount a Samba share. Just open it and add a new network share.
And finally, you can create a file or directory.
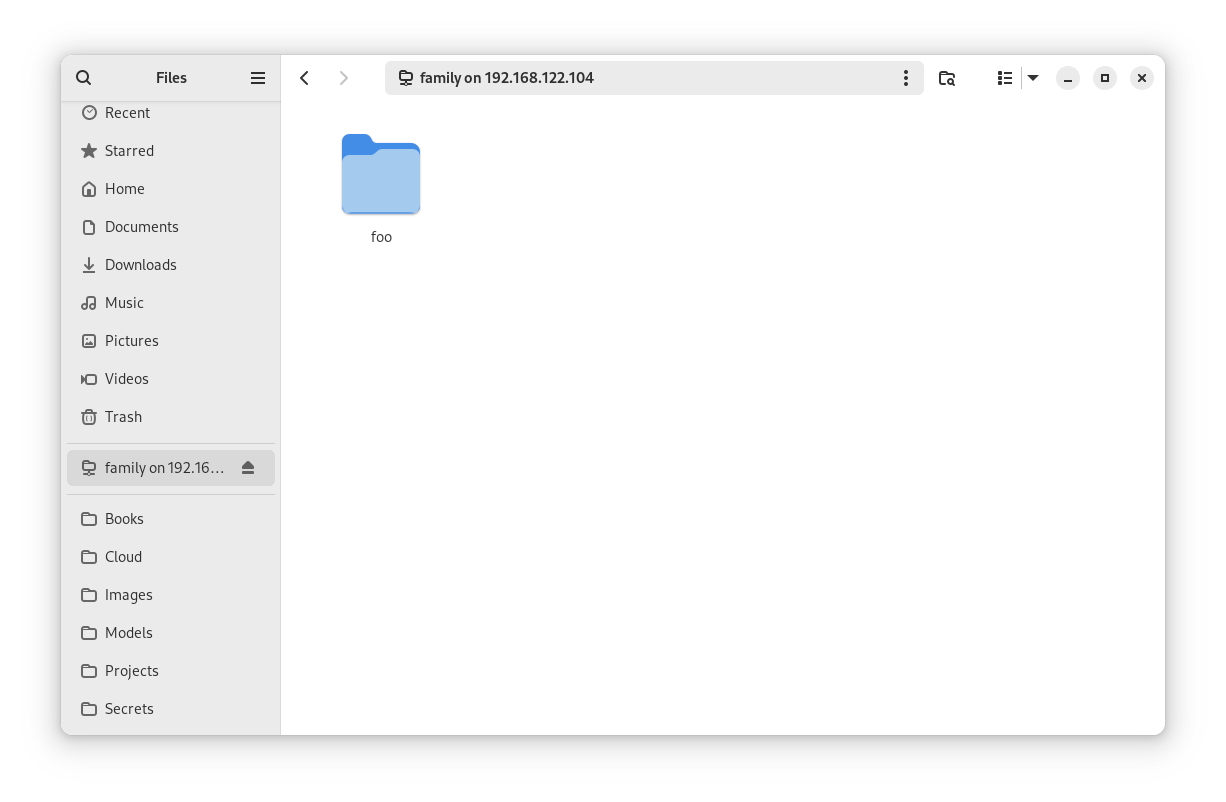
Which should be reflected on our machine with the desired permissions.
# Check new directory
$ sudo ls -lZ /var/lib/samba/shares/family/
total 0
drwxrwx---. 2 alice alice system_u:object_r:samba_share_t:s0 6 May 19 16:10 foo
But wait, this directory is created for Alice only. What, if we want each directory to be owned by our "family" group? Easy enough. Just change the smb.conf file to the below.
[global]
        workgroup = SAMBA
        security = user

        passdb backend = tdbsam

        printing = cups
        printcap name = cups
        load printers = No
        cups options = raw

[family]
        comment = Family Share
        path = /var/lib/samba/shares/family
        valid users = @family
        create mode = 0660
        directory mode = 0770
        force group = family
        browseable = Yes
        read only = No
After disconnecting and reconnecting to your samba share, everything should be as you like.
# Show effective permissions
$ sudo ls -lZ /var/lib/samba/shares/family/
total 0
drwxrwx---. 2 alice family system_u:object_r:samba_share_t:s0 6 May 19 16:20 bar
drwxrwx---. 2 alice alice  system_u:object_r:samba_share_t:s0 6 May 19 16:10 foo
Docs & Links
Samba is a vast topic, and I may add at least 10 more articles digging into all the details. Yet, there are some awesome resources already out there. Same can be said about SELinux.


 admin
adminConclusion
With this rather long article, you should be all set up for your first file server. I will add another article, discussing NFS, for sure. And maybe I will find some more opportunities to talk about Samba.
Said that, how do you share files at home? How do you sync between your TV, Windows and Linux devices? Do you use Samba? Something else? Let me know, I am eager to find out how you do things and what can be added to the blog.