Ansible - Inventories 1/3
Ansible is a quite simple and powerful automation tool. You can configure servers, switches, firewalls, cloud providers and much more. One essential thing needs to be considered, if you start using Ansible: "How to tell Ansible everything it needs to know about the infrastructure?"


Ansible is a quite simple and powerful automation tool. You can configure servers, switches, firewalls, cloud providers and much more. One essential thing needs to be considered, if you start using Ansible: "How to tell Ansible everything it needs to know about the infrastructure?"
In this article, we will have a look at the static Ansible inventory and how you can start to use it, so it fits your needs. In the following article, we will also cover variables, group_vars and dynamic inventories.
If you are just starting with Ansible, I recommend having a look at the "Ansible - Getting Started" and "Ansible - Playbooks" articles, first.
Prerequisites
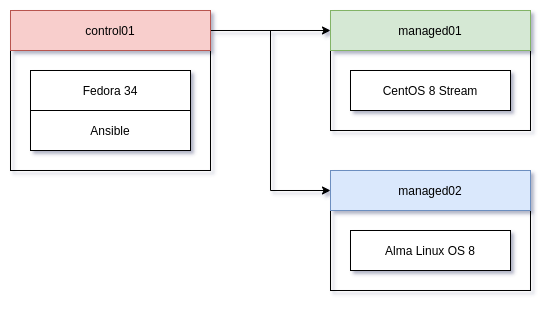
For this tutorial, you will need 3 machines and a project directory on your control node (the machine executing the Ansible code). My examples will use these nodes:
- control01 (a VM with Fedora 34)
- managed01 (a VM with CentOS 8 Stream)
- managed02 (a VM with Alma Linux OS 8.4)
All of these machines must be reachable from each other, and a user (admin) must be created.
The below diagram will show how the setup will look like.
If you don't want to build these machines on your own, you can use the below Vagrantfile to spin up all 3 VMs, create a user on each node (user=admin, password=password) and install Ansible on the control node.
If you don't know Vagrant, you can have a look at the "Vagrant - Getting Started" article, beforehand.
$script = <<-SCRIPT
useradd admin
usermod -aG wheel admin
echo "password" | passwd admin --stdin
SCRIPT

Vagrant.configure("2") do |config|

  # libvirt
  config.vm.provider "libvirt" do |lv|
    lv.cpus = 2
    lv.memory = 2048
    # libvirt.qemu_use_session = false
  end

  # virtualbox
  config.vm.provider "virtualbox" do |vb|
    vb.cpus = 2
    vb.memory = 2048
    vb.linked_clone = true
  end

  # hyper-v
  config.vm.provider "hyperv" do |hv|
    hv.cpus = 2
    hv.memory = "1024"
    hv.maxmemory = "2048"
    hv.linked_clone = true
  end

  config.vm.provision "shell" do |shell|
    shell.inline = $script
  end

  # control01
  config.vm.define "control01" do |instance|
    instance.vm.box = "fedora/34-cloud-base"
    instance.vm.hostname = "control01"
    instance.vm.provision "shell" do |shell|
      shell.inline = "sudo dnf install ansible -y"
    end
  end

  # managed01
  config.vm.define "managed01" do |instance|
    instance.vm.box = "centos/stream8"
    instance.vm.hostname = "managed01"
  end

  # managed02
  config.vm.define "managed02" do |instance|
    instance.vm.box = "almalinux/8"
    instance.vm.hostname = "managed02"
  end

end
You just need to copy the above code in a Vagrantfile and run the below commands to get started.
# Start the machines
$ vagrant up

# Get the status
$ vagrant status

# Get all IP Addresses
$ vagrant ssh-config

# SSH into control01
$ vagrant ssh control01
$ sudo -u admin -i
Now that this is out of the way, let's dig into Ansible inventories.
Static inventory
The first type of inventory, I want to introduce, are so-called "static inventories". These are basically files, which are represented in files. You can either write them in YAML or INI format. I will stick to the YAML format, since all the Ansible code is YAML anyway.
Preparation
Let's create a simple project directory, a playbook and an inventory file.
# Create project directory
$ mkdir ansible-inventory
$ cd ansible-inventory

# Create an ansible.cfg
$ touch ansible.cfg

# Create inventory
$ mkdir -p inventories/practice/
$ touch inventories/practice/inventory.yml

# Create the playbook file
$ touch playbook.yml
That's everything you need, for now. I already opted to organize the inventories in a separate directory. This way, we can add more inventories easily, and it actually helps to get a better understanding of inventory structures.
Let's also fill in the ansible.cfg. This is only needed for this tutorial to avoid issues with unknown SSH identities. In a production setup, you should validate the fingerprints of the hosts.
# ansible.cfg

[defaults]
host_key_checking = FalseBasics
Let's also fill in the playbook and add some content to the inventory. You may need to adapt the inventory.yml, based on your IP addresses.
---
# playbook.yml

- name: "Target all hosts"
  hosts: "all"

  tasks:

    - name: "Output information"
      debug:
        msg: "{{ ansible_hostname }} with {{ ansible_distribution }}"
---
# inventories/practice/inventory.yml

all:
  hosts:
    control01:
      ansible_ssh_host: 192.168.122.100
    managed01:
      ansible_ssh_host: 192.168.122.101
    managed02:
ansible_ssh_host: 192.168.122.102That's it. Before running the code and see what's happening, let's have a closer look at the inventory file line-by-line.
all:The first line is mandatory and will create a group, named "all". We will have a look at groups in another section. For now, it is sufficient to say that all hosts should be part of the "all-group".
hosts:The second line tells Ansible, that we want to assign hosts to the group. Everything directly below this group should be host identifiers.
control01:The third line is a host identifier, also named inventory_hostname. This can be a name, but also an IP address. In a production environment with working DNS, you should use the resolvable DNS names here.
ansible_ssh_host: 192.168.122.100Each of the host identifiers has another line to tell Ansible the correct IP address for the host. This is only needed, since I want to use hostnames as host identifiers without proper DNS resolution.
Now, that this is out of the way, let's actually execute our playbook and see what's happening.
# Execute playbook with inventory.yml
$ ansible-playbook -k -K -i inventories/practice/inventory.yml playbook.yml
The -k option is needed, so you can enter the password. The -K option is needed to provide the sudo password. If you use the example deployment via Vagrant, these will be user=admin and pass=password.
The -i option needs the path to the inventory as an argument.
If you want to avoid entering the full inventory path over and over again, you can edit the ansible.cfg as shown below.
# ansible.cfg

[defaults]
host_key_checking = False
inventory = inventories/practice/inventory.ymlThis will reduce the above command to the below line.
# Execute playbook with default inventory
$ ansible-playbook -k -K playbook.yml
Groups
Having a simple list of hosts is often not the desired behavior. You may want to sort the hosts in groups and run different workflows on each of them, or limit runs to certain groups of hosts. In the below example, we will update the inventory and sort the hosts in groups.
---
# inventories/practice/inventory.yml

all:
  children:

    control:
      hosts:
        control01:
          ansible_ssh_host: 192.168.122.100

    managed:
      hosts:
        managed01:
          ansible_ssh_host: 192.168.122.101
        managed02:
ansible_ssh_host: 192.168.122.102Let's also update the playbook and make use of these groups.
---
# playbook.yml

- name: "Target all hosts"
  hosts: "all"

  tasks:

    - name: "Output information"
      debug:
        msg: "{{ ansible_hostname }} with {{ ansible_distribution }}"

- name: "Only control node"
  hosts: "control"

  tasks:

    - name: "Install Git"
      ansible.builtin.package:
        name: "git"
        state: "present"
      become: true

- name: "Only managed nodes"
  hosts: "managed"

  tasks:

    - name: "Upgrade system"
      ansible.builtin.package:
        name: "*"
        state: "latest
become: trueRunning this playbook with the below command will output the information message for all nodes, install git on the control node only and update all node.
# Execute playbook with default inventory
$ ansible-playbook -k -K playbook.yml
Limit scope
Now that you are aware of host- and group entries, you may wonder how to limit the playbook run without editing config files or the inventory. I often run in a situation, where I just want to run a playbook on a subset of hosts without running it on the other hosts.
In the above example, we may say: "I just want to update the managed nodes, but waiting for the installation on control01 is taking too long."
This can be easily done with a command line switch. Running the below commands will limit the execution to some of these subsets.
# Limit to group "control"
$ ansible-playbook -k -K --limit control playbook.yml

# Limit to host "managed01"
$ ansible-playbook -k -K --limit managed01 playbook.yml

# Limit to group "control" and host "managed01"
$ ansible-playbook -k -K --limit control,managed01 playbook.yml

# Limit to group managed, but exclude "managed01"
$ ansible-playbook -k -K --limit control,\!managed01 playbook.yml
This allows very granular limitation where the playbook should run and where it shouldn't.
Useful tools
Lastly, let's have a look at the ansible-inventory command. I already mentioned it in the "Ansible - Overview" article. Now, let's have a look how this tool helps us to manage inventories. This is especially useful, if your inventory grows bigger.
You can display the inventory in a "graph" way.
ansible-inventory --graph -i inventories/practice/inventory.ymlYou can also add the variables to this graph
ansible-inventory --graph --vars -i inventories/practice/inventory.ymlYou can also output the effective host entry, including the allocated variables for a single host.
ansible-inventory --host managed01 -i inventories/practice/inventory.ymlOr, just output the inventory as a list.
ansible-inventory --list -i inventories/practice/inventory.ymlYou can also limit the output to a host or group pattern.
ansible-inventory --graph -i inventories/practice/inventory.yml managedDocs & Links
The official Ansible documentation provides a ton of support for structuring and organizing your inventory.
Conclusion
Having a good inventory, maintained in Ansible, is very easy and can be done in some minutes. Afterwards, you will be able to address single hosts, group them and display the inventory in different ways.
In the future articles for this series, we will have a look at variables and dynamic inventories, too.


