Cloud-Init - Raspberry Pi and AlmaLinux OS
I am in the middle of setting up my home lab, but also working on a project, named beby.cloud. In both cases, I want to do the initial setup automatically on a Raspberry Pi system. Fortunately, AlmaLinux OS supports Cloud-Init, so we can handle this easily.


I am in the middle of setting up my home lab, but also working on a project, named beby.cloud. In both cases, I want to do the initial setup automatically on a Raspberry Pi system. Fortunately, AlmaLinux OS supports Cloud-Init, so we can handle this easily.
Let's dive into AlmaLinux OS on Raspberry Pi.
Introduction
Before going into too much detail, let me give you a quick rundown of the technologies. Since we want to deploy AlmaLinux OS on a Raspberry Pi, and automate the initial setup with Cloud-Init, I have collected some information about these below.
Raspberry Pi
The Raspberry Pi is the most popular consumer System on a Chip (SoC) in the market. You can get your hands on a Raspberry Pi 4 for just $35 (in reality more like $45). You will get a chip-card sized and fanless little computer, which can be used for all kinds of tinkering and small projects.

The small board provides everything you need to run some small applications and integrate it in your home/lab environment. You can run a Nextcloud instance, deploy some containers, or use the GPIO ports to connect your own circuits to it.
AlmaLinux OS
AlmaLinux OS is my preferred Red Hat family Linux for personal and private use. Today, it is a direct downstream of CentOS Stream, but features API/ABI compatibility to Red Hat Enterprise Linux (RHEL).
Therefore, you can expect all the features you can find in CentOS Stream or RHEL, including Firewalld, Podman, SELinux, TuneD, Cockpit and many more. Also, the community is stunning, the developers very motivated and overall it is just a pleasure to work with the folks working on AlmaLinux OS.
Cloud-Init
Finally, we have Cloud-Init on the agenda. Cloud-Init is a quite simple, but powerful way to configure machines. Let's assume, you want to set up a machine, that requires some settings pre-configured or packages installed. You can think of "create a user" or "install updates", but also "configure network" or "put a file there".
In another article, I gave a brief overview of the underlying magic and a first "Getting Started".
Setup
Introduction done, let's get to work. We want to deploy AlmaLinux OS (9) on a Raspberry Pi and also use Cloud-Init for some automation. In my case, I also want to use a USB drive, instead of the SD card. The procedure is exactly the same, though.
Preparing the image
First, you need to download the image from the AlmaLinux website. This can be done graphical via the download page or on the command line.

wget https://repo.almalinux.org/rpi/9/images/AlmaLinux-9-RaspberryPi-latest.aarch64.raw.xzNext, you need to put the image on an SD card or another USB device. I tested this with the Raspberry Pi Imager and command line, again.
Raspberry Pi Imager
Let's start with the graphical way. You need the Raspberry Pi imager. This one can be downloaded from Flathub, for example.
flatpak install flathub org.raspberrypi.rpi-imagerAfter opening it, you will be greeted by a menu, where you need to choose your Raspberry Pi device model, the image you want to put on it and your desired device to write the image to.
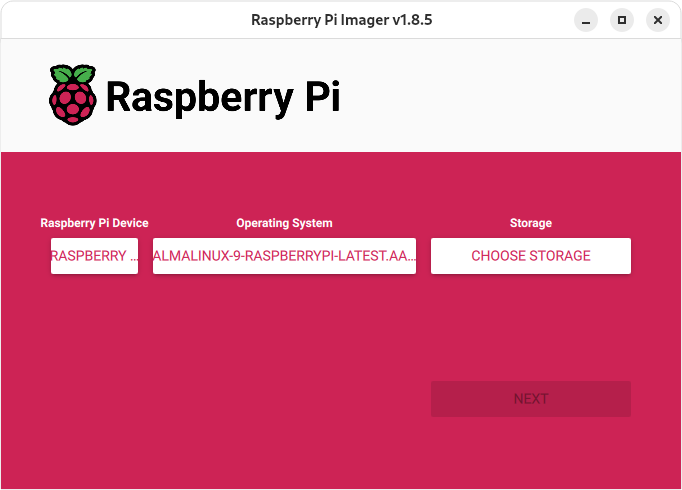
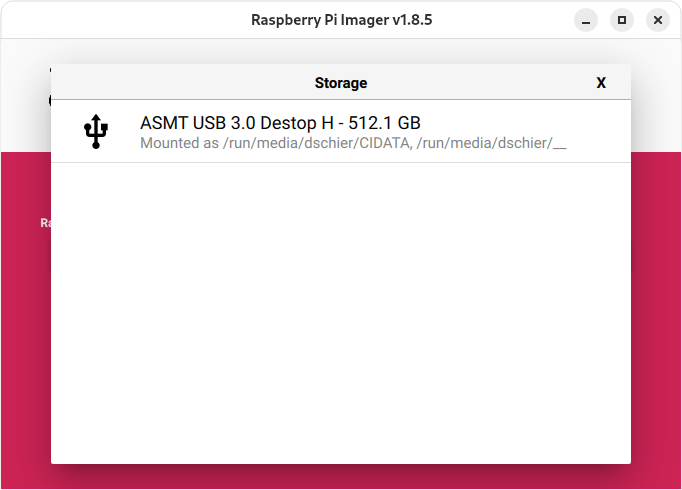
Afterward, hit the "NEXT" button, ignore further customizations and write the image to your desired device. You will get a hint when the process is done.
Command Line
If you don't want to install an additional package, or you simply love the command line, you can achieve the same. The tools required should be present on all major Linux distributions.
After plugging in your device, you need to find the device name and path. Assuming that the device might have data on it or not, might have a partition or not, the best tool to find new devices is dmesg. It basically reports all kernel activity, including devices plugged in and out.
$ sudo dmesg
...
[182635.351557] sd 0:0:0:0: Attached scsi generic sg0 type 0
[182635.572077] sd 0:0:0:0: [sda] 62521344 512-byte logical blocks: (32.0 GB/29.8 GiB)
...
In my case, the device was mounted to sda. Therefore, the address is /dev/sda. Now that we know the device name, we can write the downloaded image file to the SD card or USB device. This can be done with xzcat and dd.
# Write image to a device
$ xzcat path/to/downloaded/AlmaLinux-9-RaspberryPi-latest.aarch64.raw.xz | sudo dd status=progress bs=4M of=/dev/DEVICENAME_FROM_ABOVE
Depending on the write speed of your device, this might take a moment. And that's already it. The image is on your desired device. For now, this is 100% default and we need to customize it a bit.
Adding Cloud-Init
Now that we have a prepared device (SD card or USB device) with the AlmaLinux OS image on it, can start with simple automations. AlmaLinux OS for the Raspberry Pi ships with Cloud-Init by default. In the past, I addressed Cloud-Init in the article "Cloud Init - Getting Started". Let's apply this knowledge to the Raspberry Pi.
Creating the files
First, we need to create a simple user-data file. This file can be used to install additional packages, configure the default user, or provide your SSH key. Let's take an example:
# #cloud-config
hostname: "myhost.local"
ssh_pwauth: false

package_upgrade: true

packages:
  - "bash-completion"

users:

  - name: "node-admin"
    groups: [ "wheel" ]
    lock_passwd: false
    passwd: "$6$aX65oOK..."
    ssh_authorized_keys:
      - "sk-ssh-ed25519@openssh.com AAAAGnNrLXNzaC1lZDI1NTE5QG9wZW5z..."
user-data
In this example, we will set the hostname to myhost.local, we will also forbid the login with passwords via SSH. Console logins with a password are still possible. We will also ensure that packages will be updated on first boot (this may take some time), and install bash-completion as an additional package. Lastly, we create a user with some useful options. Said user will have sudo permissions via the wheel group. It might also be beneficial to add our SSH key. Lastly, we configure a password, which needs to be provided as a hashed value.
To hash your password, you can use the mkpasswd command or the openssl command. The openssl command should be available on all major distributions and not considerably different. I am using the SHA512 method here, which should work on all modern Linux installations.
# use openssl
$ openssl passwd -6 YourPassWord

# use mkpasswd (mostly RedHat family)
$ mkpasswd --method=sha512crypt password
You might also want to configure your network. You can do this with an additional file, named network-config. Here, you can configure your Ethernet port.
version: 2

ethernets:
  eth0:
    dhcp4: false
    optional: true
    addresses:
      - "192.168.178.51/24"
    gateway4: "192.168.178.1"
    nameservers:
      addresses:
        - "9.9.9.9"
        - "149.112.112.112"
network-config
If you don't know which DNS server to choose, you might like my "Spotlight - Alternatives for Google DNS" article. But, back to topic.
As you can see, it is pretty simple to configure the user-data and network-config files. Now, we need to copy them over to our SD card or USB device.
After writing the image to the device, two partitions were created on it. One of them is named CIDATA. To find the partitions, you can use any file manager or the command line again.
# Show mounted devices
$ mount
...
/dev/sda1 on /run/media/dschier/CIDATA type vfat (rw,nosuid,nodev,relatime,uid=1000,gid=1000,fmask=0022,dmask=0022,codepage=437,iocharset=ascii,shortname=mixed,showexec,utf8,flush,errors=remount-ro,uhelper=udisks2)
/dev/sda2 on /run/media/dschier/__ type ext4 (rw,nosuid,nodev,relatime,seclabel,errors=remount-ro,uhelper=udisks2)
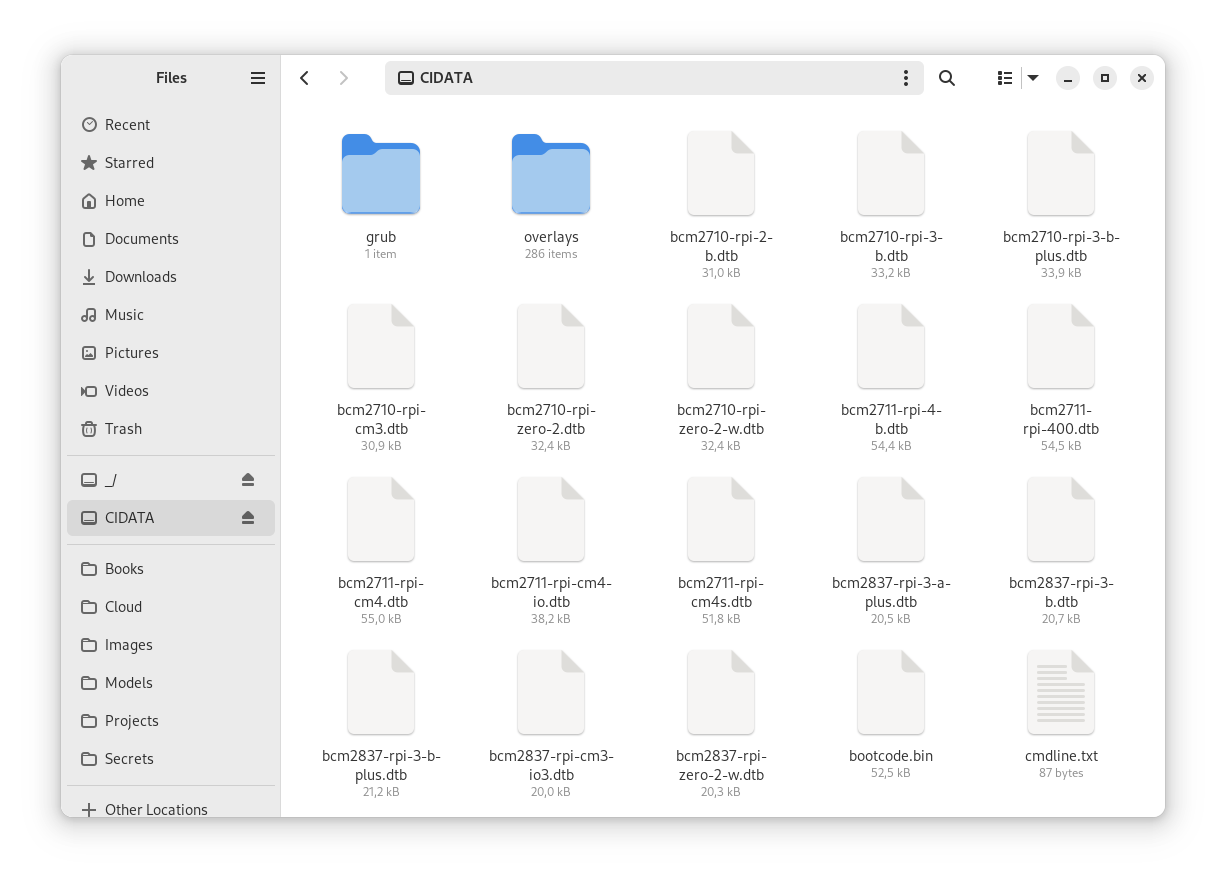
You only need to copy the user-data and network-config file to the CIDATA partition.
# Copy the files
$ cp user-data network-config /run/media/dschier/CIDATA/
cp: overwrite '/run/media/dschier/CIDATA/user-data'? y
As you can see, there was a user-data file already, which needs to be overwritten. Now, safely remove the SD card or USB device from your machine.
First Boot-Up
After lots of preparation (basically writing an image and copying two files), you can plug the SD card into your Raspberry Pi. If you used a USB drive, like me, ensure that there is no SD-Card connected and connect your USB drive. Starting with the Raspberry Pi 4, you should use one of the blue USB 3 ports.
Finally, turn on your Raspberry Pi. It's time to boot up.
If you connected a display, you will see lots of boot-up magic happening. If not, you can connect to the Pi after a short while via SSH. This does not mean, that your Pi is done already. Instead, Cloud-Init might still be working in the background for you. You can monitor the progress by checking the log file.
# Follow the log from Cloud-Init
$ tail -f /var/log/cloud-init-output.log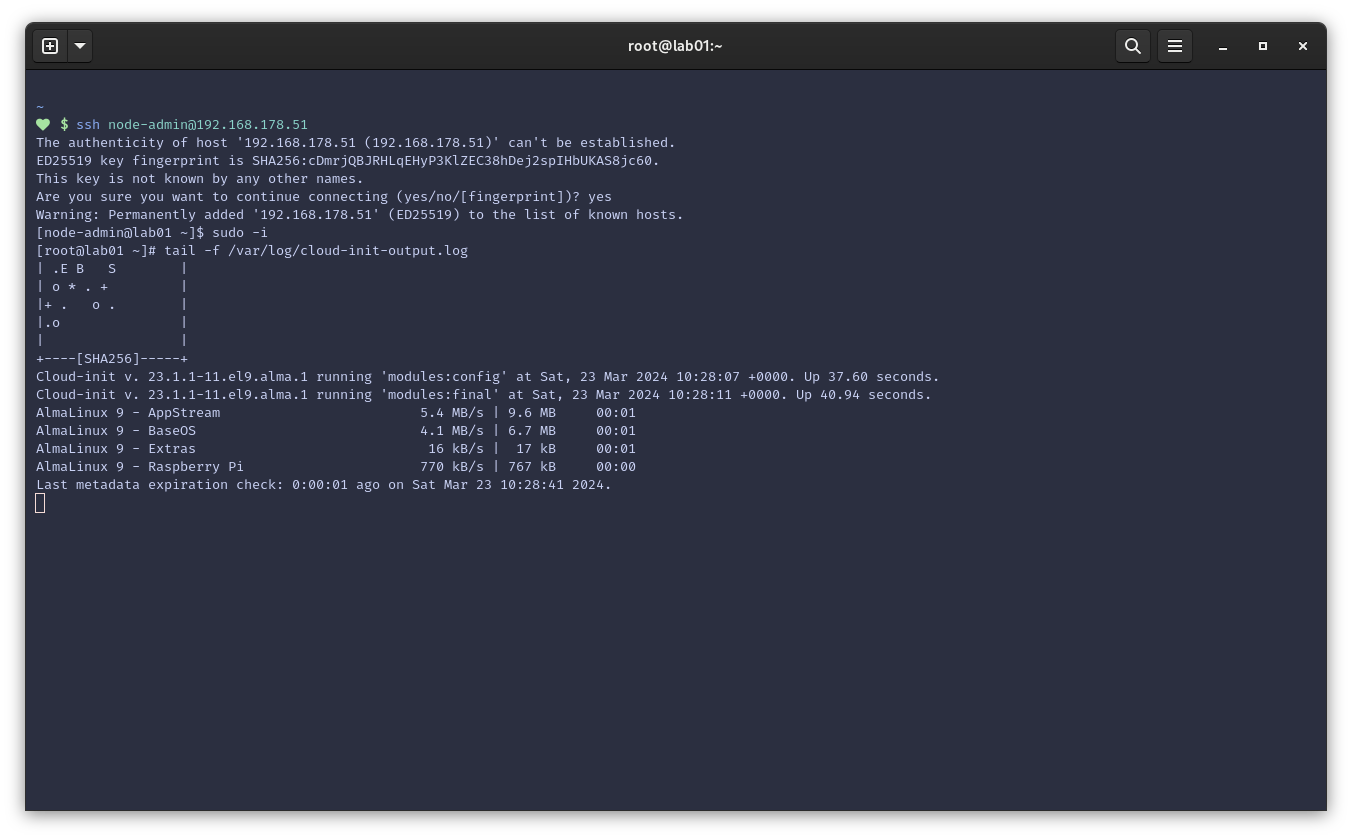
If everything is done, Cloud-Init will report that it is finished, and you are ready to use your Raspberry Pi with a fresh AlmaLinux OS 9 on it. Now, you have an automated setup, and maybe you are interested in one of my automation articles, for even more automation with Ansible, Cloud-Init or one of my container articles. By the way, Podman is already pre-installed.
Docs & Links
There may not be a lot of documentation, but let me give you the sources I used. Also, I am working on my home server repository, where you can find the above applied for my Lab.
 Daniel Schier
 Daniel Schier


Conclusion
Phew, I wasn't aware that this article might become a 2000 words-long guide. But hey, I hope it is good enough for you. I am also interested in your opinions. Do you consider using AlmaLinux OS on the Raspberry Pi? Which OS are you running on it, today?
Let me know, please. I am curious why you do so and what you miss in Raspbian/Raspberry Pi OS alternatives.


