Git - Getting Started
If you just started with development, you may have never heard of Git or Source Code Management at all. This article will provide an overview why you should get in touch with Git and how to use it for your projects.


If you just started with development, you may have never heard of Git or Source Code Management at all. This article will provide an overview why you should get in touch with Git and how to use it for your projects.
From my very personal perspective: I am using Git for all kinds of stuff like Ansible, Podman or Vagrant projects.
What is Git?
Git is a free and Open Source distributed source code management system. It can handle basically everything from small personal projects to large scale development like the Linux kernel.
Git is very easy to learn and will be useful the moment you are doing your first git init. You don't need to have a team to start using Git - it is already beneficial to use it for your personal projects.
You will find Git in all kinds of Open Source projects like Ansible, Podman or the Linux Kernel. Git offers features like version control, tagging, distributed development and much more.
Get Started
Getting started with Git is really easy. This section will provide a step-by-step tutorial, so you can use Git for every project afterwards.
Prerequisites
The only hard requirement is some kind of computer, where you need to install the Git client.
It is recommended to use Git with a Git server (remote repository), but you don't have to. If you want to use Git with a server, you can have a look at free offerings from this list:
- Gitea (free / Open Source / self-hosting available)
- GitHub (free / proprietary - Microsoft / most projects)
- GitLab (free / Open Source / self-hosting available)
- Bitbucket (free / proprietary - Atlassian)
- Codeberg (free / Gitea based)
Feel free to check each of them and pick the one best fitting to your needs. At While True Do, we are using Gitea, available at code.while-true-do.io.
Installation
Installing Git is easy and just takes a few minutes. On Fedora Linux, it may be pre-installed already. Anyway, let's assure it is there.
# Install on Fedora/CentOS
$ sudo dnf install git

# Install on Ubuntu/Debian
$ sudo apt-get update && sudo apt-get install git

# Check after install
$ git --version
git version 2.30.2
You can install Git on every Linux and Unix derivate, Windows or macOS. If none of these work for you, you can always build Git from source. I will focus on the command line client, you can also check out the UI clients if you prefer.
Configuration
Configuration of Git is also quite easy. Most of the settings are optional, but a username and email address are recommended to be set. These will only be used to mark your commits. Authentication to the Git server is handled differently, depending on the server you are using. You can use any data you like for these parameters, but it is recommended to use something that indicates who you are.
Let's set a username and email, for now. I will also set the default branch name to "main".
# Configure name
$ git config --global user.name "yourname"

# Configure mail
$ git config --global user.mail "your@email.com"

# Change default branch name
$ git config --global init.defaultBranch main

# Show configuration
$ git config --global --list

# Edit configuration
$ git config --global --edit
Check out the official documentation if you would like to perform more detailed configuration of the Git client.
Git Workflow
Before digging into commands, let's have a look at the actual command sequence in Git. There are 4 major stages in Git, that will be used to manage your code.
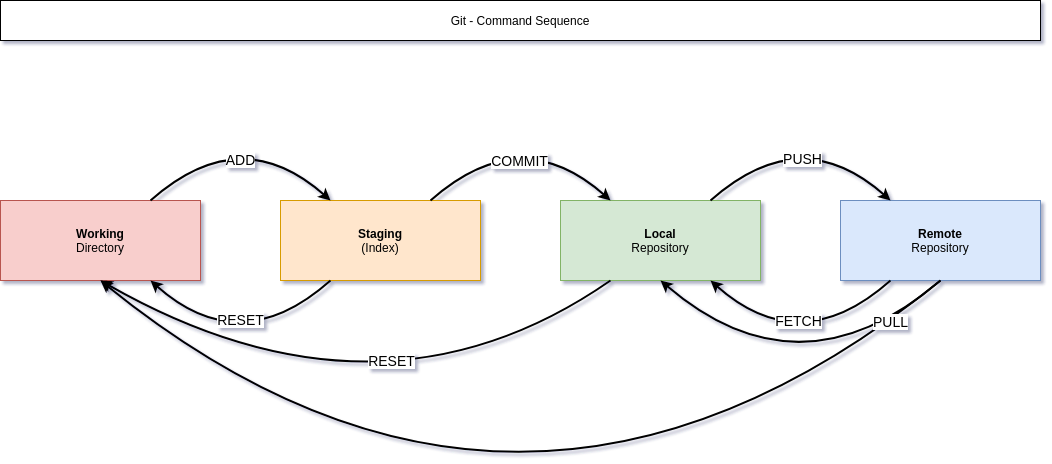
Working Directory indicates the directory on your machine. You can see it as your good old project folder. Everything in there, like creating files, editing code or the folder structure works as usual.
Staging indicates all files, that will be managed Git. Git will track all changes, that are added to the index. But, Git will not track them automatically, you have to ADD changes each time.
Local repository is your own local repository. Due to the nature of being distributed, this stage is needed, so everybody can manage the own changes in the own repository.
Remote repository is usually located on a Git server. This is where your code is published, to enable sharing and collaboration with colleagues or other enthusiasts. It is also useful as a backup and the most important feature is, that changes to the code are tracked here in one place.
Getting Help
Git provides very good documentation as well as tons of help for users and developers. For me, it is one of the best documented projects you can find.
If you need an explanation or possible parameters for a command, you can use the built-in help functions.
# Get help
$ git --help

# Get help for a command
$ git init --help

# Manpages
$ man git
If the built-in help is not sufficient, you can always refer to the online documentation.
Local Repository
After this very short overview of "how Git works", let's have a look at some examples of how Git actually works. Due to the distributed nature of Git, two thirds of the work is done in the local repository.
Initialize the first project
The first few steps are happening in our working directory only. So let's create a new repository to see how everything works.
# Create a directory
$ mkdir project01

# Change to directory
$ cd project01/

# Initialize Git
$ git init

# Create some files (for demonstration)
$ touch README.md
$ touch code.yml
$ touch code.sh

# Check directory content
$ ls -la
total 0
drwxrwxr-x. 1 dschier dschier  56 15. Mär 08:18 .
drwx------. 1 dschier dschier 562 15. Mär 08:18 ..
-rw-rw-r--. 1 dschier dschier   0 15. Mär 08:18 code.sh
-rw-rw-r--. 1 dschier dschier   0 15. Mär 08:18 code.yml
drwxrwxr-x. 1 dschier dschier  98 15. Mär 08:18 .git
-rw-rw-r--. 1 dschier dschier   0 15. Mär 08:18 README.md
As you can see, there are 3 files and one directory in the new project. The .git directory was created by the git init command and holds all the local metadata. Normally, you don't need to interact with it directly.
Status
Git can show the state of your repository at any time. This command also suggests useful "next commands".
# Get the status
$ git status
On branch main

No commits yet

Untracked files:
  (use "git add <file>..." to include in what will be committed)
	README.md
	code.sh
	code.yml

nothing added to commit but untracked files present (use "git add" to track)
We are provided with a lot of information here:
- the branch is "main"
- there are no commits
- there are 3 untracked files
Add
Let's add some files to staging. This makes Git aware, that it should take care of the changes.
# Add changes from a single file
$ git add README.md

# Check the status
$ git status
On branch main

No commits yet

Changes to be committed:
  (use "git rm --cached <file>..." to unstage)
	new file:   README.md

Untracked files:
  (use "git add <file>..." to include in what will be committed)
	code.sh
	code.yml

# Add all pending changes
$ git add .

# Check the status again
$ git status
On branch main

No commits yet

Changes to be committed:
  (use "git rm --cached <file>..." to unstage)
	new file:   README.md
	new file:   code.sh
	new file:   code.yml
Now all 3 files (specifically the recent changes) are present and the stage and ready to be committed.
Commit
A commit in Git gives changes a meaningful version and also adds some description to the commit. Be aware, that only staged changes are committed.
# Commit changes (interactive editor)
$ git commit

# Commit changes (message on command line)
$ git commit -m "My commit message
can also be on multiple lines."

# Get the status
$ git status
On branch main
nothing to commit, working tree clean
It is strongly recommended to use meaningful commit messages. The below example shows how this may look like. You can think of an e-mail-like format with "subject", "body" and "footer".
#<--- 72 characters --------------------------------------------------->
(Feature|Fix|Refactor|Document): <SUBJECT>

The body, explains the change a bit more. You can:

- use
- bullet
- points

Adding a footer to address the issue is recommended.

- resolves: #0815
- addresses: #4711
#<--- 72 characters --------------------------------------------------->Logs
After one or more commits, you can also check the history of your commits and check files when and who changed them.
# Get logs
$ git log
commit c3711b843def39a72e4be207b43d4d8ac52a7e53 (HEAD -> main)
Author: dschier <dschier@while-true-do.io>
Date:   Mon Mar 15 08:44:44 2021 +0100

    My first commit

# Check changes of one file
$ git blame <FILE>
This way, you can get a brief overview of all changes and commit messages for your repository.
Remotes
Working with remote repositories is mandatory to work with a team. Until now, nothing was published to a server. In case you delete the directory, it will be gone. To allow others to access or change the code a Git server is needed. Please have a look at the Prerequisites again or check out this overview.
You can also use Git itself to set up a server.
Managing Remotes
The first thing we need to do is adding and reviewing remotes. I am using a repository at code.while-true-do.io, but you can use whatever you want.
After the creation of an empty repository, most Git servers will provide a guide like this:
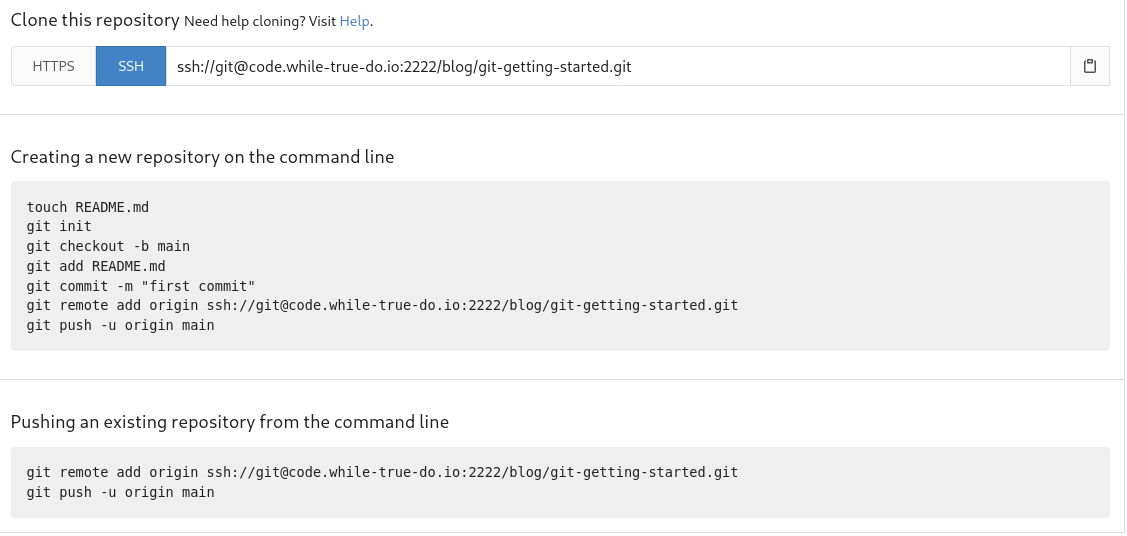
We have a repository, so let's do this.
# Add a remote
$ git remote add origin ssh://git@code.while-true-do.io:2222/blog/git-getting-started.git

# Push to the repository the first time
$ git push --set-upstream origin main

# Check the existing remotes.
$ git remote -v
origin	ssh://git@code.while-true-do.io:2222/blog/git-getting-started.git (fetch)
origin	ssh://git@code.while-true-do.io:2222/blog/git-getting-started.git (push)

# Check the status
$ git status
On branch main
Your branch is up to date with 'origin/main'.

nothing to commit, working tree clean
That's already it. Now you can use push and pull to interact with the remote repository.
Fetch, Pull & Push
We already pushed in the last section. This push command is only needed for the very first push of a branch. For every consecutive push, you can simply use git push. But let's have a look at the other options, too.
# Fetch only the repository data
$ git fetch

# Update local repository and working directory from remote
$ git pull

# Do some changes
$ echo "# Git - Getting started" > README.md
$ echo "A guide available at while-true-do.io" >> README.md

# Add, commit and push
$ git add README.md
$ git commit -m "Update: Description"
$ git push

# Check status
$ git status
On branch main
Your branch is up to date with 'origin/main'.

nothing to commit, working tree clean
Most developers will do a git pull before starting and git push when the work is done. This should ensure, that you are up-to-date with recent changes and that your changes are in a valid format.
Clone
If you want to work on an already existing project, you don't need to git init or git remote add. You can simply clone the remote repository to your local repository.
As an example, you can use the below command, using this repository.
# Clone an existing remote
$ git clone https://code.while-true-do.io/blog/git-getting-started.git
The command will create a new directory named git-getting-started and clone the content, including the Git metadata in this directory. You can also check the status and logs.
# Change to the new directory
$ cd git-getting-started/

# Check status
$ git status
On branch main
Your branch is up to date with 'origin/main'.

nothing to commit, working tree clean

# Check logs
$ git log
commit 18d5be02560721f9ac3ab66ceb61007c2d511886 (HEAD -> main, origin/main, origin/HEAD)
Author: dschier <dschier@while-true-do.io>
Date:   Mon Mar 15 14:33:06 2021 +0100

    Update: Description

commit c3711b843def39a72e4be207b43d4d8ac52a7e53
Author: dschier <dschier@while-true-do.io>
Date:   Mon Mar 15 08:44:44 2021 +0100

    My first commit

# Inspect the changes in README.md
$ git blame README.md
18d5be02 (dschier 2021-03-15 14:33:06 +0100 1) # Git - Getting started
18d5be02 (dschier 2021-03-15 14:33:06 +0100 2) A guide available at while-true-do.io
Next Steps
After this very basic introduction, you are good to go for your first projects. In case you want to work in a team, you should check out branches and merging. It also a good idea to get aware of rebase. In case you want to use Git for release versioning, you should have a look at tags.
I will address some of these topics in a "Git - Next Steps" guide, very soon.
Documentation
The Git team offers a ton of documentation to dig in. You can find the references, a complete Git book and video content over at the Git Website.

Conclusion
Git is a very powerful Source Code Management tool, which can be used for personal projects or teams. It does not matter, if you have just started your own project or if you are joining a team of developers.
Git will help you to solve many version control problems and the good old concept of "script.sh -> script-1.0.sh -> script-1.0-final.sh" is now part of the past.


