Podman - Images
Podman is a daemonless container engine and getting started is quite easy. Running a container may be nice for some experimenting or deployments, but most of us want to add tools to the container and customize them to our needs. This can be done with container images.

Podman is a daemonless container engine and getting started is quite easy. Running a container may be nice for some experimenting or deployments, but most of us want to add tools to the container and customize them to our needs. This can be done with container images.
What are Images?
One of the huge benefits of containers is, that you can reproduce the setup of somebody else, based on a container image and a simple command. An image should contain everything, that is needed to run a specific service and provide this service in a convenient way. But what is an image?
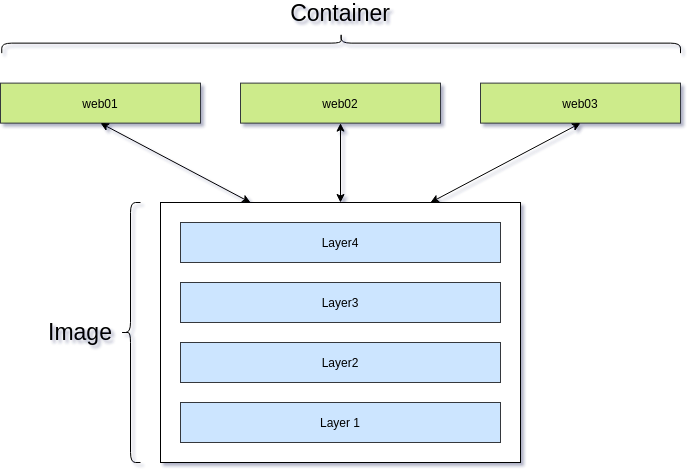
A container image is an immutable collection of files that bundle all needed essentials to run a certain service. These files are often referred to as layers and can contain code, dependencies, additional software or installations. These layers are built on top of each other and form the image.
Usage
The first things I wanted to know were: "How do I search?", "How do I pull?", "How do I list?". I will explain how to interact with images a lot more in some future article. At this point, let me give some common commands and explain the Anatomy of container images.
# Search for Images
$ podman image search httpd

# Pull an Image
$ podman image pull docker.io/library/httpd

# List available Images
$ podman image ls

# Remove an Image
$ podman image rm docker.io/library/httpd
Container
Every time you start a container, an additional layer will be created (the container layer), which is writable. The underlying image will not be touched. Let's see this in an example. The below commands will create 3 containers, based on the httpd image.
# Pull the image
$ podman image pull docker.io/library/httpd
Trying to pull docker.io/library/httpd:latest...
Getting image source signatures
Copying blob e444656f7792 done
Copying blob a076a628af6f done
Copying blob eb1da3ea630f done
Copying blob 0ec35e191b09 done
Copying blob 4aad5d8db1a6 done
Copying config 683a7aad17 done
Writing manifest to image destination
Storing signatures
683a7aad17d3baed344799b397c55a9ccbc3ddabf0d077862739585ee76d4cb3

# List all images
$ podman image ls
REPOSITORY               TAG     IMAGE ID      CREATED      SIZE
docker.io/library/httpd  latest  683a7aad17d3  3 weeks ago  142 MB

# Start first container
$ podman container run -dt --name web01 -P docker.io/library/httpd
80cc084df830fbe419eba25d94cfa3ebab13b797aadd61edeb3ad3b800bfc6f6

# Start second container
$ podman container run -dt --name web02 -P docker.io/library/httpd
ac54533c42d84f08bf0d648fe9508deabe8a581a7222e0189ff56c27b3ba7210

# Start third container
$ podman container run -dt --name web03 -P docker.io/library/httpd
99c23bd482c1669c4b225c43583a76efeaa62722527da6b4f85bb791bd599d65

# List running containers
$ podman container ls
CONTAINER ID  IMAGE                    COMMAND           CREATED         STATUS             PORTS                  NAMES
99c23bd482c1  docker.io/library/httpd  httpd-foreground  21 seconds ago  Up 20 seconds ago  0.0.0.0:44879->80/tcp  web03
ac54533c42d8  docker.io/library/httpd  httpd-foreground  27 seconds ago  Up 27 seconds ago  0.0.0.0:41057->80/tcp  web02
80cc084df830  docker.io/library/httpd  httpd-foreground  40 seconds ago  Up 40 seconds ago  0.0.0.0:40735->80/tcp  web01

# List images again
$ podman image ls
REPOSITORY               TAG     IMAGE ID      CREATED      SIZE
docker.io/library/httpd  latest  683a7aad17d3  3 weeks ago  142 MB
As you can see, there are 3 running containers, but only one image present.
Building Images
You can extend an image with additional layers to build your own image. This is often known as build. This is very handy, if you want to prepare an image for publishing, so others can use it. Furthermore, you can tweak and tune Images from other vendors to your needs.
Building an image is quite easy in Podman. Since Podman is meant as a Docker replacement, you can use a Dockerfile. In a future article, I will talk more about Dockerfiles and other options to build images. For now, I will demonstrate it in a very simple example.
Let's assume, we want to build an image with our customized website in it.
# Create a directory
$ mkdir myweb
$ cd myweb

# Create a directory and file(s) for our website (see content below)
$ mkdir website
$ touch website/index.html

# Create a Dockerfile (see content below)
$ touch Dockerfile
Edit the index.html with this content:
<!doctype html>
<html>
<head>
	<title>Container Website</title>
</head>
<body>
	<h1>Container Website</h1>
	<p>Hello world! This is my first page in a volume.</p>
</body>
</html>Edit the Dockerfile with this content:
FROM docker.io/library/httpd
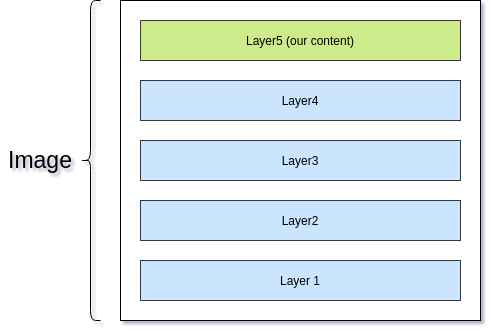
COPY ./website/ /usr/local/apache2/htdocs/Yep, that's already a valid Dockerfile. The image will be based on docker.io/library/httpd and a new layer will be added. In this case the new layer will be the content of thewebsite directory. You just need to build the new image.
# Build the image
$ podman image build -t myweb .

# List the available Images
$ podman image ls
REPOSITORY               TAG     IMAGE ID      CREATED         SIZE
localhost/myweb          latest  e9ccbf89b2aa  26 seconds ago  142 MB

# Start a container from the new image
$ podman container run -dt --name myweb01 -P myweb
a02d357f21ff0ae8e6f7c06518bedf61cbcb39679906c966fc88e29ad2096ec4

# Check for running containers
$ podman container ls
CONTAINER ID  IMAGE                    COMMAND           CREATED        STATUS            PORTS                  NAMES
a02d357f21ff  localhost/myweb:latest   httpd-foreground  9 seconds ago  Up 9 seconds ago  0.0.0.0:43013->80/tcp  myweb01

# Test the container
$ curl localhost:43013
<!doctype html>
<html>
<head>
	<title>Container Website</title>
</head>
<body>
	<h1>Container Website</h1>
	<p>Hello world! This is my first page in a volume.</p>
</body>
</html>
As you can see, a new layer was added and the new image is now having our content on top. In case you are changing the content, you just need to re-build the image and start a new container.
Sure, the example may be a liiiiiiittle bit simpler than real world scenarios... And there may be better options to inject a simple HTML file into a container (volumes), but I hope it helps to understand how the layering is working.
Documentation
Building Images is a huge topic. I will show more examples in some future articles and explain how you can fully customize existing images or even create new images from scratch. If you cannot wait, please feel free to read about images here:
Conclusion
Container images provide a convenient way to bundle files, installations, dependencies, applications and more. Every time one starts a container a new writable layer is created, but the Image itself is not touched. This ensures, that one can deploy many containers from the same base image.
For customization, one can build new images and deploy containers from the new images.


