Podman - Networking 1/3
Podman is a daemonless container management engine, that provides more than just containers. You can use Container networking to establish communication between containers and build more complex deployments.

Podman is a daemonless container management engine, that provides more than just containers. You can use Container networking to establish communication between containers and build more complex deployments.
This article is Part 1 and will provide some guidance of container networking and how you can use it. The guide also uses some commands and knowledge presented in earlier articles (Getting Started, Podman Volumes 1/2, Podman Images).
Network Layers
Before starting to define networks and communicate from container to container or the host, you need to understand how the different layers of networking work together.
For this article, I will stick to the example of the Apache httpd container from Docker Hub.
Overview
This diagram represents the different layers, that will be explained in the below sections.
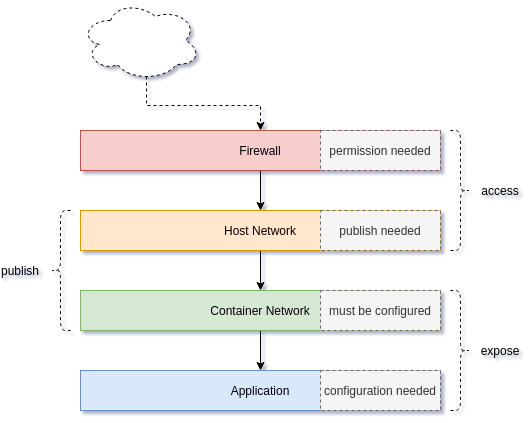
Let's check each layer, bottom-up in the next sub-sections.
Application
The first artifact of the network is the application. Almost all applications can listen to defined addresses and/or defined ports. By checking the Apache httpd config file, we can see what's happening.
# Check out a file and destroy the container
$ podman run -it --rm \
  docker.io/library/httpd \
  cat /usr/local/apache2/conf/httpd.conf > httpd.conf
The above command will start the container and create a new file with the same content in our local file system for inspection. Let's have a look in the file with the editor or viewer of your choice.
# Open the file with less (read only)
$ less httpd.conf

# Open the file with vi/vim
$ vi httpd.conf

# Open the file with nano
$ nano httpd.conf
Now that the file is open, we can search for these lines:
...
# Listen: Allows you to bind Apache to specific IP addresses and/or
# ports, instead of the default. See also the <VirtualHost>
# directive.
#
# Change this to Listen on specific IP addresses as shown below to
# prevent Apache from glomming onto all bound IP addresses.
#
#Listen 12.34.56.78:80
Listen 80
...As you can see, the application (Apache httpd) is configured to listen to Port 80. Such a configuration can be found in almost all network facing applications like MariaDB, nginx or Redis. When the container starts, this will be the port which can be used in the container network.
Container Network
The container network is a virtual network layer for your containers. In Podman you will face the situation of 2 different network behaviors - rootless and rootfull. For now, I will stick to the rootfull networking, since rootless would introduce another layer.
In the last section, we have seen that an application can have ports listening/open. These ports are automatically exposed to the container network. This also means, that containers will be reachable via these networks and ports. Podman has a default network for rootfull containers, which will be used, if no other network is specified.
# List all networks
$ sudo podman network ls
NAME    VERSION  PLUGINS
podman  0.4.0    bridge,portmap,firewall,tuning

# Start a container
$ sudo podman container run -dt --name net01 httpd
5f713cdba5b87c99ba3921908a98ba1433ba8f15e162ce7d08730121a46903c3

# Check running containers
CONTAINER ID  IMAGE                           COMMAND           CREATED        STATUS            PORTS                  NAMES
5f713cdba5b8  docker.io/library/httpd:latest  httpd-foreground  2 minutes ago  Up 2 minutes ago  net01

# Inspect the container and search for the IP address
$ sudo podman container inspect net01 | grep IPAddress
            "IPAddress": "10.88.12.56",
As you can see, the containers has an IP address assigned to it. From the previous section, we also know, it will have Port 80 listening. Let's see if this is true and connect to it.
# Spin up a temporary container and execute a command
$ sudo podman run -it fedora:33 curl 10.88.12.56:80
<html><body><h1>It works!</h1></body></html>
Cool, that worked.
As you can see, if the application is listening, we will automatically expose the ports to the container network. The next section will cover, how we can publish a port to the Host Network.
Host Network
The next layer of networking is on the host. The default Podman network is a bridge network. This means, that you will have a network device on your bridging the container network to your host network.
The container from the previous section is using this bridge, too. Let's have a look.
# Inspect the container and search for the IP address
$ sudo podman container inspect net01 | grep IPAddress
            "IPAddress": "10.88.12.56",

# Check the existing podman networks
$ sudo podman network ls
NAME    VERSION  PLUGINS
podman  0.4.0    bridge,portmap,firewall,tuning

# Check if is bridge configured
$ sudo podman network inspect podman | grep bridge
                "bridge": "cni-podman0",
                "type": "bridge"

# Check the host network config
$ ip addr show cni-podman0
5: cni-podman0: <BROADCAST,MULTICAST,UP,LOWER_UP> mtu 1500 qdisc noqueue state UP group default qlen 1000
    link/ether c2:f0:d0:f1:62:45 brd ff:ff:ff:ff:ff:ff
    inet 10.88.0.1/16 brd 10.88.255.255 scope global cni-podman0
       valid_lft forever preferred_lft forever
    inet6 fe80::c0f0:d0ff:fef1:6245/64 scope link
       valid_lft forever preferred_lft forever
As you can see, the container has an IP of our network cni-podman0 and this network is bridged to our host. This means, we should be able to directly connect to it from our host.
# Test from the host
$ curl 10.88.12.56:80
<html><body><h1>It works!</h1></body></html>
Easy enough, but what if we want to connect from another machine or not using the bridge IPs? This part can be done with "publishing". A port Publish can be done in Podman in 2 ways - automatic publish or manual publish. Let's start 2 new containers.
# Start an unpublished container (or re-use from the previous section)
$ sudo podman container run -dt --name net01 httpd

# Start an automatically published container
$ sudo podman container run -dt --name net02 -P httpd

# Start a manually published container
$ sudo podman container run -dt --name net03 -p 9090:80 httpd

# List all running containers
$ sudo podman container ls
CONTAINER ID  IMAGE                           COMMAND           CREATED         STATUS             PORTS                  NAMES
12e889b9c536  docker.io/library/httpd:latest  httpd-foreground  12 seconds ago  Up 12 seconds ago  0.0.0.0:9090->80/tcp   net03
698edcb93c68  docker.io/library/httpd:latest  httpd-foreground  24 seconds ago  Up 23 seconds ago  0.0.0.0:39357->80/tcp  net02
5f713cdba5b8  docker.io/library/httpd:latest  httpd-foreground  31 seconds ago  Up 31 seconds ago                         net01
As you can see, there are 3 containers running. The "net01" container is not published at all and only reachable via container network or the bridge.
The "net02" container is having automatically mapped port 39357 to publish the application port 80. This automatic mapping, is only possible, because the image we are using has an expose-statement EXPOSE 80 in the build file/Dockerfile.
The "net03" container is having a manually published port. We mapped the host port 9090 to the container port 80.
All of these containers can be reached in different ways.
# Test net01 via container bridge
curl 10.88.12.56:80
<html><body><h1>It works!</h1></body></html>

# Test net02 via automatic published port
curl localhost:39357
<html><body><h1>It works!</h1></body></html>

# Test net03 via manual published port
curl 10.88.12.56:9090
<html><body><h1>It works!</h1></body></html>
In case you are having a firewall on your host (default for Fedora, CentOS, RHEL), you should have a look to the next section.
Firewall
In the previous sections we had a look at the different layers of container networking. Depending on your setup, you may also need to adjust the firewall of your host to allow access from other hosts. Podman provides a plugin to handle firewall changes for you.
# Check the existing networks
$ sudo podman network ls
NAME    VERSION  PLUGINS
podman  0.4.0    bridge,portmap,firewall,tuning
As you can see the firewall plugin is enabled and therefore, Podman will open the needed ports for published ports automatically.
Conclusion
Container networking is a huge topic and can be expanded in various ways. Now that you have a good understanding of the different layers, it is easier to debug why certain applications do not communicate or are not reachable. In some future articles, we will create different scenarios, that may be useful for complex applications.


