Podman - Remote Management
Podman is the daemonless, rootless drop-in replacement for Docker. Furthermore, you can manage containers on a remote machine without connecting to it first. With Podman's remote capabilities, this is just a matter of configuration files.


Podman is the daemonless, rootless drop-in replacement for Docker. Furthermore, you can manage containers on a remote machine without connecting to it first. With Podman's remote capabilities, this is just a matter of configuration files.
Let's dig into podman remote and manage home servers and smaller environments remotely, without the demand for additional automation.
Podman
Podman is the daemonless container engine for OCI and Docker images alike. It provides options to run root and rootless containers. Furthermore, Podman has integrations in systemd and capabilities to run pods, similar to Kubernetes.
If you never heard about Podman, I recommend taking a look at the various articles in the blog.
 Daniel Schier
Remote Management
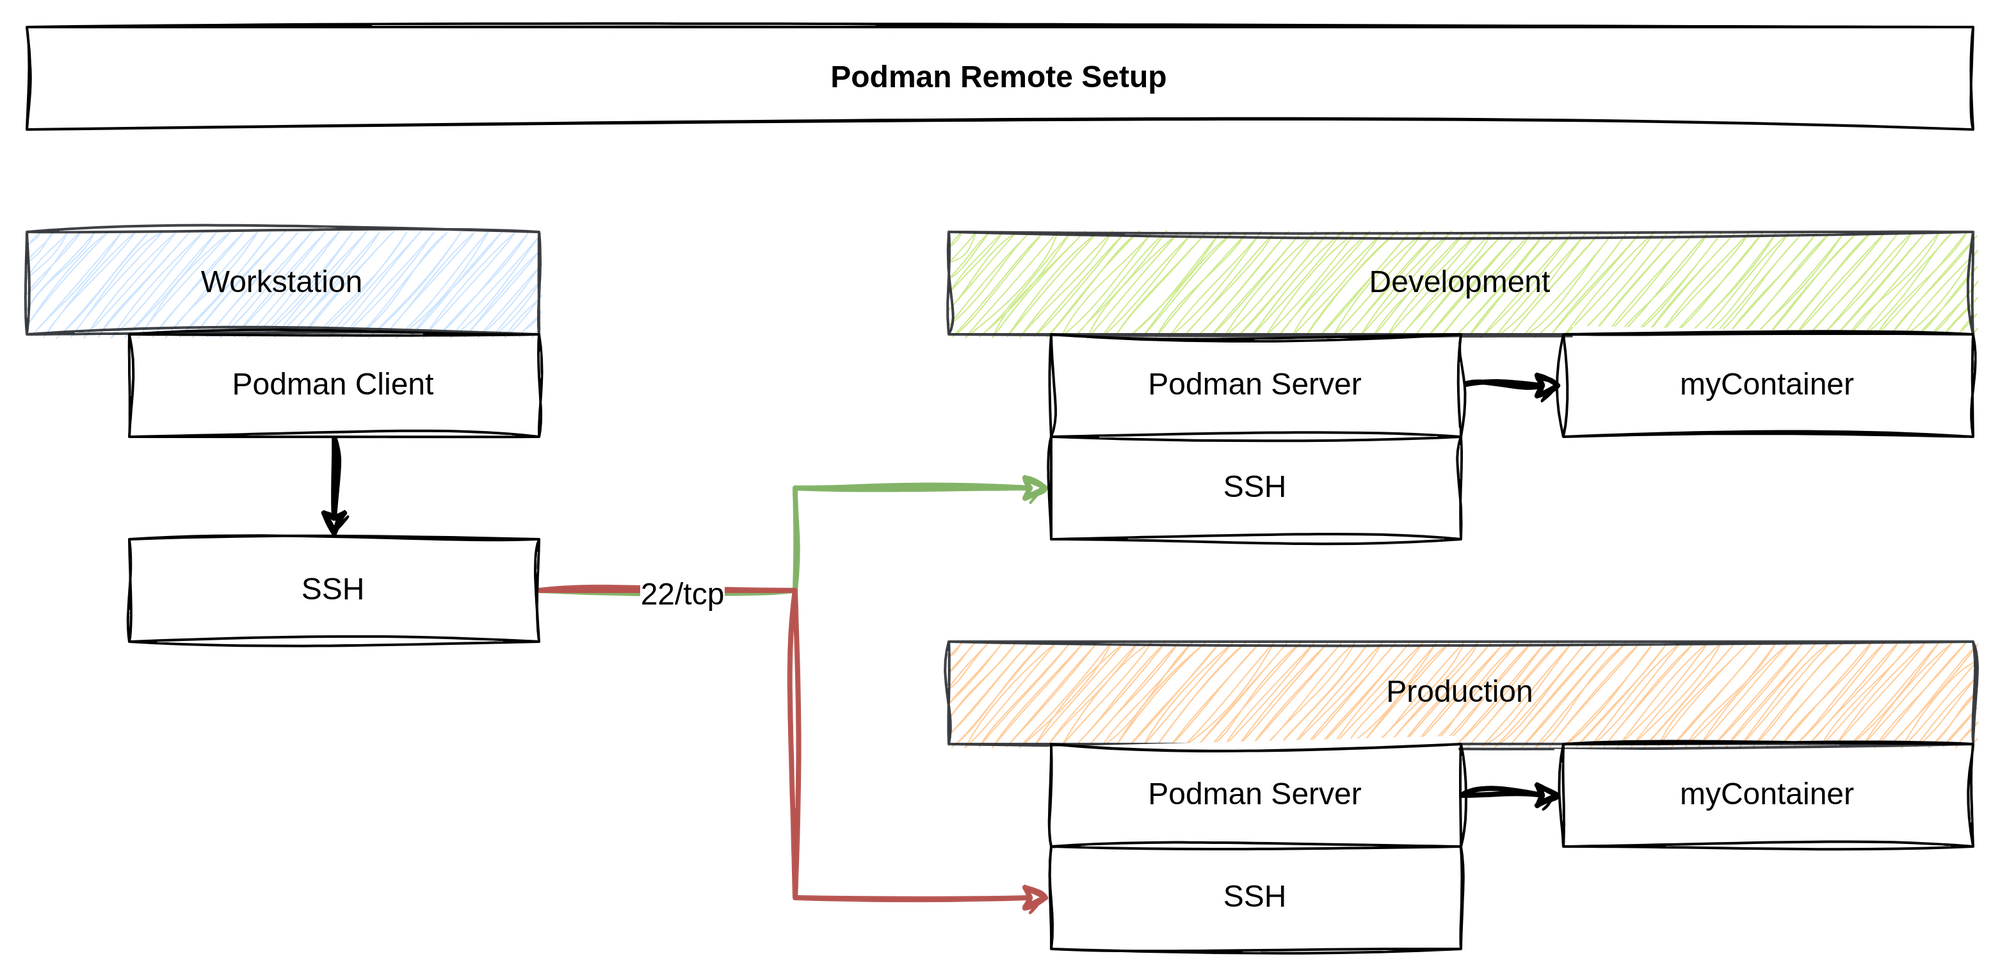
Podman can be managed remotely. In this scenario, the Podman client controls containers on a remote machine. This can be useful for local VMs and remote servers alike.
Scenario
I have opted to install two servers. Not because I have a ton of hardware, but to demonstrate how you can get a super simple "local → development → production" workflow. Furthermore, this makes it possible to run Podman on macOS or Windows and execute commands directly on a Linux server.
This time, I am also opting for rootless containers with Podman. This makes lots of sense, if multiple people want to use the machine for development, but also for security reasons. Therefore, I will have the same user on my local workstation and on the servers.
I will document the steps to run root/system containers, too.
Install Server(s)
I am using AlmaLinux 9.2 as the base operating system. After installing it, according to the upstream documentation, you can continue with the following steps.
First, you need to install the packages.
# Server: Install Podman
$ sudo dnf install -y podman
Afterward, you need to enable the sockets. These are not used for a background daemon that controls containers, but to allow API commands towards Podman.
# Server: Enable service for a non-root user (executed as the desired user)
$ systemctl enable --user --now podman.socket

# Server: Enable that services for this user are running, if not logged in
$ sudo loginctl enable-linger $USER
For root/system containers, the command is a bit simpler, but totally optional.
# Server: Enable service for root
$ sudo systemctl enable --now podman.socket
You also need to ensure that the SSH daemon is running.
# Server: Enable sshd, if not already running
$ sudo systemctl enable --now sshd.service
That's already it. Let's hop over to the client side.
Install Client
On the client side, you only need the Podman client. In case of Linux, this is similar to the server side. On Fedora Linux (what I am using), it comes already pre-installed in most variants. In case you don't have it, it's just a command away.
# Install Podman on Fedora/CentOS/AlmaLinux
$ sudo dnf install podman

# Install Podman on Debian/Ubuntu
$ sudo apt install podman
For macOS and Windows, you need to follow the detailed install instructions.
Configure Client
So far, so nice. The final step, we require, is 🥁 a bit of configuration. It's not much, and most likely you can already imagine what we need to do. Anyway, let's do it.
Do you remember, that we have two machines? One for development, the other one for production. We want to use both convenient. To do so, we must copy our SSH public key to both machines in the desired user account.
# copy public key to the development machine
$ ssh-copy-id user@development.machine

# copy public key to the production machine
$ ssh-copy-id user@production.machine
You might ask: "Why is this needed?" Well, Podman remote uses SSH to connect to your machine. This way, you don't have to open and monitor any additional port. This falls perfectly in line with the approach Ansible uses.
The next step is, that we need to configure the Podman client. This is done in a config file on the workstation. This configuration file is written in TOML format (one of the weirdest formats for me). For our two machines, the entry would look something like this:
[engine]
active_service = "development"

[engine.service_destinations.development]
uri = "ssh://USER@development.machine:22/run/user/1000/podman/podman.sock"
identity = "/var/home/USER/.ssh/id_ed25519"

[engine.service_destinations.production]
uri = "ssh://USER@production.machine:22/run/user/1000/podman/podman.sock"
identity = "/var/home/USER/.ssh/id_ed25519"
Let's digest this quickly.
The first "table" (TOML terminology) entry [engine] holds only one configuration. The active_service is the default service that will be used. Each of the subsequent "tables" defines a service. Such a service is made out of a uri and the identity. The uri defines the destination of a socket. As you can see, it points to the socket for our users on the server. The identity points to the private key on our workstation, which will be used to connect to the machine via SSH.
Instead of writing the file directly, you can also use commands to add new machines.
# Add a connection
$ podman system connection add --identity path/to/public.key --port PORT SERVICENAME USER@server
You can also check if the configuration is applied properly via:
$ podman system connection list
Name         URI                                                                Identity                           Default
development  ssh://USER@development.machine:22/run/user/1000/podman/podman.sock   /var/home/USER/.ssh/id_ed25519  true
production   ssh://USER@production.machine:22/run/user/1000/podman/podman.sock  /var/home/USER/.ssh/id_ed25519  false
You can test your configuration like so:
# Test development
$ podman --remote -c development info

# Since development is default, you can skip the connection
$ podman --remote info

# Test production
$ podman --remote -c production info
First Deployments
Well, now we can run pods on these servers, right? Let's try this!
# Run locally on the workstation
$ podman run -dt -p 8080:80 docker.io/library/nginx

$ podman ps
CONTAINER ID  IMAGE                           COMMAND               CREATED        STATUS        PORTS                 NAMES
20bfd147b2ea  docker.io/library/nginx:latest  nginx -g daemon o...  3 seconds ago  Up 3 seconds  0.0.0.0:8080->80/tcp  practical_hellman

# Run remotely on development (default)
$ podman --remote run -dt -p 8080:80 docker.io/library/nginx

$ podman --remote ps
Key Passphrase:
CONTAINER ID  IMAGE                           COMMAND               CREATED         STATUS         PORTS                 NAMES
7837da788322  docker.io/library/nginx:latest  nginx -g daemon o...  11 seconds ago  Up 11 seconds  0.0.0.0:8080->80/tcp  kind_dewdney
Well, this worked perfectly fine. Now, we can develop locally. Deploy to our development server for approval and if everything is fine, we can deploy to production.
Let's say, we have a makeshift deployment pipeline. With just a bit of automation, maybe in a pipeline, we can make sure that this works perfectly fine.
Docs & Links
There are, of course, some links I want to share.
Conclusion
Now, we can deploy to remote machines. Build locally, test everything, push to a registry and stage on a server. Finally, deploy to production and all of this without complicated scripts or sophisticated infrastructure.
Life can be easy, It can be simple.
Anyway, have you ever used podman remote? If so, how do you make use of it? I would love to hear about your experience.


