Podman - Volumes 1/2
Podman is a container engine, which provides a daemonless and rootless way to deploy containers in development and production. It's easy to get started, but how do you persist data? How do you put data from your development workstation in a container without building a new image again and again?


Podman is a container engine, which provides a daemonless and rootless way to deploy containers in development and production. It's easy to get started, but how do you persist data? How do you put data from your development workstation in a container without building a new image again and again?
This article explains how to solve these issues with volumes.
General concept
Let's start with some general idea, what's going on with volumes. In the Getting Started article, I already showed how you can start a simple web server.
# Start the container
$ podman container run -dt --name web01 -P httpd

# Check if the container is running
$ podman container ls
Running this command will lead to a situation as shown in the picture below. For now, I will ignore the networking part, but focus on the Disk/Volume management.
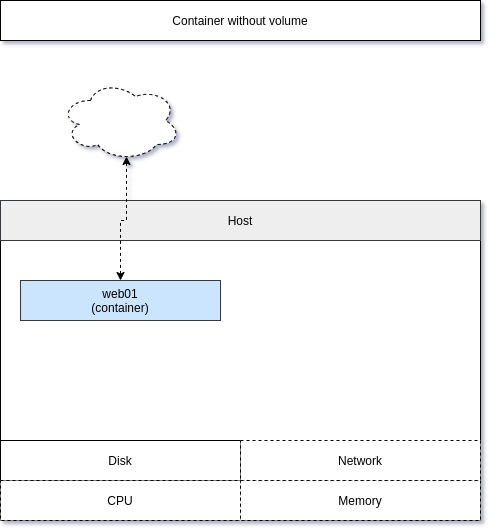
Removing the container will remove all data in it, too.
To solve this and allow containers to write data to disk, you may use volumes. A volume will be mounted to the container and if you re-create it with the same volume, the data will still be available.
Volumes
Volumes can be used in different ways. The most common and well known is "mounting a directory". This can be done with Podman, too. Let's take the last example (web server) and provide our own index.html page.
First, let's create a minimal website in a directory.
# Replace user with your username
$ mkdir /home/USER/web01/

# Create the index.html
$ touch /home/USER/web01/index.html
You need to edit the index.html file and provide some content. You can use this example:
<!doctype html>
<html>
<head>
	<title>Container Website</title>
</head>
<body>
	<h1>Container Website</h1>
	<p>Hello world! This is my first page in a volume.</p>
</body>
</html>
Afterwards, you need to start a new container mounting the directory.
# Replace USER with your username
$ podman container run -dt --name web01 -P -v /home/USER/web01/:/usr/local/apache2/htdocs/:ro,z httpd

# Check if the container is running and the published port
$ podman container ls
CONTAINER ID  IMAGE                           COMMAND           CREATED        STATUS            PORTS                  NAMES
ee38877ac557  docker.io/library/httpd:latest  httpd-foreground  6 seconds ago  Up 6 seconds ago  0.0.0.0:46625->80/tcp  web01
The command introduces a new parameter -v which is the short version of --volume. You can also see three different statements, delimited by a ":". The first option is the source on your host, the second one is the destination in the container, the last option is for volume options. Here you can see ro to mount the volume as "read only" and z to ensure that SELinux context is properly set for the source directory.
You can test if everything is working fine by pointing your browser to localhost:46625 (the port from the above command) or by running a simple command.
$ curl localhost:46625
<!doctype html>
<html>
<head>
	<title>Container Website</title>
</head>
<body>
	<h1>Container Website</h1>
	<p>Hello world! This is my first page in a volume.</p>
</body>
</html>
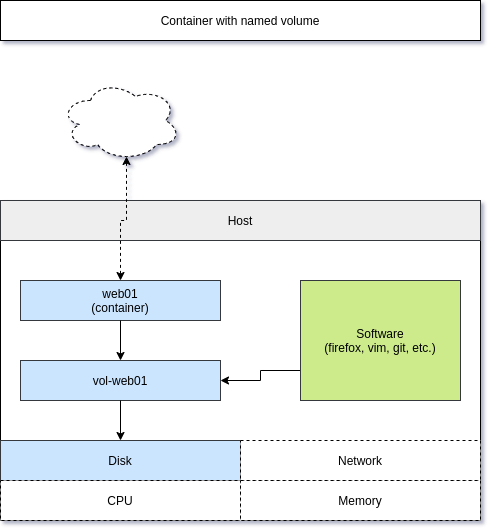
You can also change the website from your host. If you skip the ro mount option, you can also edit the website from inside the container. For a graphical representation, the below diagram may be helpful.

Named Volumes
Named volumes are another way to provide volumes. Podman provides a sub-command to create, list and remove named volumes. Podman also takes care of the proper permissions and SELinux context, which makes it way easier to use a named volume. Let's see how this works.
# Create a new volume
$ podman volume create web01

# List volumes
$ podman volume ls
DRIVER      VOLUME NAME
local       web01

# Inspect a volume (this way you can also see the real path)
$ podman volume inspect web01
[
    {
        "Name": "web01",
        "Driver": "local",
        "Mountpoint": "/home/USER/.local/share/containers/storage/volumes/web01/_data",
        "CreatedAt": "2021-02-07T21:50:50.084212978+01:00",
        "Labels": {},
        "Scope": "local",
        "Options": {},
        "UID": 0,
        "GID": 0,
        "Anonymous": false
    }
]

# Remove a volume
$ podman volume rm web01
Creating a volume beforehand is cool, but podman also can provide volumes on demand. The command is the same, as if you want to use a pre-created volume. Podman takes care and creates the volume if needed.
# Create a container and mount a named volume
# Named volume will be created, if not existing
$ podman container run -dt --name web01 -P -v vol-web01:/usr/local/apache2/htdocs/ httpd
You can copy the above index.html in the real path, and it will just work until you remove the volume.
# Check the real path
$ podman volume inspect vol-web01
[
    {
        "Name": "vol-web01",
        "Driver": "local",
        "Mountpoint": "/home/USER/.local/share/containers/storage/volumes/vol-web01/_data",
        "CreatedAt": "2021-02-07T21:56:50.574033196+01:00",
        "Labels": {},
        "Scope": "local",
        "Options": {},
        "UID": 0,
        "GID": 0,
        "Anonymous": false
    }
]

# Copy the index.html
cp /home/USER/web01/index.html /home/USER/.local/share/containers/storage/volumes/vol-web01/_data/
Afterwards, you can check the website as in the example before.
# Check the published port
$ podman container ls
CONTAINER ID  IMAGE                           COMMAND           CREATED        STATUS            PORTS                  NAMES
c2356ae3b042  docker.io/library/httpd:latest  httpd-foreground  3 minutes ago  Up 3 minutes ago  0.0.0.0:43105->80/tcp  web01

# Check the website
$ curl localhost:43105
<!doctype html>
<html>
<head>
	<title>Container Website</title>
</head>
<body>
	<h1>Container Website</h1>
	<p>Hello world! This is my first page in a volume.</p>
</body>
</html>
As you can see, it is easier and management is easier. The diagram below shows the example at a glance.
Documentation
There is more to volumes and these links may be helpful, if you need more options.
- https://docs.podman.io/en/latest/volume.html
- https://docs.podman.io/en/latest/markdown/podman-run.1.html#volume-v-source-volume-host-dir-container-dir-options
- https://docs.podman.io/en/latest/markdown/podman-run.1.html#mount-type-type-type-specific-option
- https://docs.podman.io/en/latest/markdown/podman-run.1.html#volumes-from-container-options
Conclusion
Podman volumes help to persist data or provide data to a container. Named volumes are easy to use and manage.
There is more to it. You can use volumes from another container or use the --mount option. For the second part, we will take care of these.


