Podman - Volumes 2/2
When it comes to #podman containers, you may face the situation, that you need to persist data across rebuilds or restarts. You may also need to inject configurations or code into a #container. This blog explains additional options to my previous articles.


When it comes to containers, you may face the situation, that you need to persist data across rebuilds or restarts. You may also need to inject configurations or code into a container. I have explained some possibilities in the articles "Podman - Images" and "Podman - Volumes 1/2".
This article will extend these options and provide some possibilities like sharing data between 2 containers or using mounts.
Volume from another container
Sometimes, you will need data from one container readable in another container. Podman provides the --volumes-from option to share data between multiple containers. This can also be done, if the source container is not even running.
A graphical representation of this scenarios may look something like this:
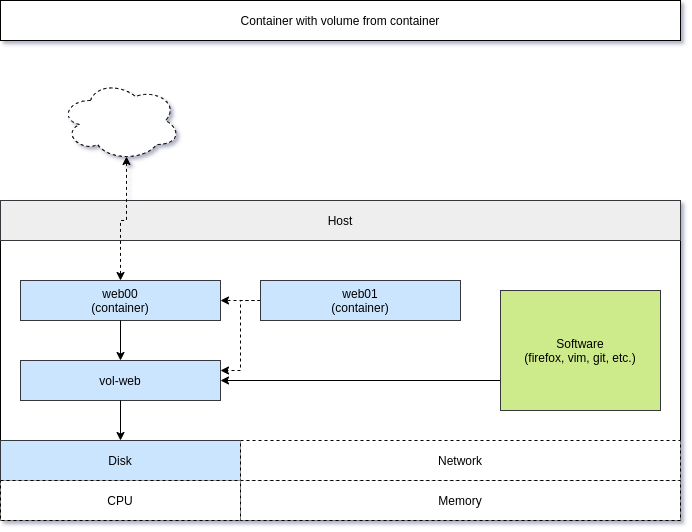
Let me show this in a simple example, where I want to share a named volume from one container to another.
# Start a new container with a named volume (vol-web)
$ podman container run -dt --name web00 -P -v vol-web:/usr/local/apache2/htdocs/ httpd

# Check status and ports
$ podman container ls
CONTAINER ID  IMAGE                           COMMAND           CREATED        STATUS            PORTS                  NAMES
2b26792d7a7e  docker.io/library/httpd:latest  httpd-foreground  6 seconds ago  Up 6 seconds ago  0.0.0.0:44043->80/tcp  web00

# Check the website
$ curl localhost:44043
<html><body><h1>It works!</h1></body></html>
We can change the content or copy a new file into the volume.
# Check volume path
$ podman volume inspect vol-web
[
    {
        "Name": "vol-web",
        "Driver": "local",
        "Mountpoint": "/var/home/USER/.local/share/containers/storage/volumes/vol-web/_data",
        "CreatedAt": "2021-02-10T15:55:10.23225835+01:00",
        "Labels": {},
        "Scope": "local",
        "Options": {},
        "UID": 0,
        "GID": 0,
        "Anonymous": false
    }
]

# Create a simple index.html
$ echo "File on vol-web mounted in web00" > /var/home/USER/.local/share/containers/storage/volumes/vol-web/_data/index.html

# Check the file
$ curl localhost:44043
File on vol-web mounted in web00
Seems like our persistent volume is working. Now, let's start a new container that uses the volumes from web00.
# Start a new container and use volumes from web00
$ podman container run -dt --name web01 -P --volumes-from web00 httpd
91daaf17169a282bf21e58501c90ff9d20486a0d0877c47be220cf0531ec2d3b

# Check the container status and port
$ podman container ls
CONTAINER ID  IMAGE                           COMMAND           CREATED        STATUS            PORTS                  NAMES
91daaf17169a  docker.io/library/httpd:latest  httpd-foreground  8 seconds ago  Up 8 seconds ago  0.0.0.0:35481->80/tcp  web01
2b26792d7a7e  docker.io/library/httpd:latest  httpd-foreground  5 minutes ago  Up 5 minutes ago  0.0.0.0:44043->80/tcp  web00

# Test the content of the new container
$ curl localhost:35481
File on vol-web mounted in web00
As you can see, the new container has inherited the volumes from web00. But, what happens if web00 will be stopped?
# Stop web00
$ podman container stop web00

# Test if the website on web01 still works
$ curl localhost:35481
File on vol-web mounted in web00
Awesome, still working. This feature can be very handy in a couple of scenarios like php-fpm + nginx or in case you want to administer a database container. You can also use this for container backups, scheduled jobs via cron and much more.
Mount
For many use cases, the previously shown examples are sufficient. But then, there is the case you need to mount a file system or even an image to a container. Sometimes, one just needs more.
Let's see this in two examples.
Mounting a container image
You can mount a complete container image to review or manipulate it. Let me show this with the fedora:33 image. I am running an interactive -it and self-destroying --rm container, that uses the --mount option and executes the command bash.
# Start container with mount options
$ podman run -it --rm --name image01 \
  --mount type=image,source=fedora:33,destination=/fedora_33 \
  fedora:33 bash

# In the container, you can check the content of /fedora_33
[root@86314bc3dd86 /]# ls -la /fedora_33/
total 16
dr-xr-xr-x. 18 root root  152 Feb 11 12:15 .
lrwxrwxrwx.  1 root root    7 Jul 27  2020 bin -> usr/bin
dr-xr-xr-x.  2 root root    0 Jul 27  2020 boot
drwxr-xr-x.  2 root root    0 Jan  6 07:48 dev
drwxr-xr-x. 43 root root 1736 Jan  6 07:48 etc
drwxr-xr-x.  2 root root    0 Jul 27  2020 home
lrwxrwxrwx.  1 root root    7 Jul 27  2020 lib -> usr/lib
lrwxrwxrwx.  1 root root    9 Jul 27  2020 lib64 -> usr/lib64
drwx------.  2 root root    0 Jan  6 07:48 lost+found
drwxr-xr-x.  2 root root    0 Jul 27  2020 media
drwxr-xr-x.  2 root root    0 Jul 27  2020 mnt
drwxr-xr-x.  2 root root    0 Jul 27  2020 opt
drwxr-xr-x.  2 root root    0 Jan  6 07:48 proc
dr-xr-x---.  2 root root  236 Jan  6 07:48 root
drwxr-xr-x.  2 root root    0 Jan  6 07:48 run
lrwxrwxrwx.  1 root root    8 Jul 27  2020 sbin -> usr/sbin
drwxr-xr-x.  2 root root    0 Jul 27  2020 srv
drwxr-xr-x.  2 root root    0 Jan  6 07:48 sys
drwxrwxrwt.  2 root root   36 Jan  6 07:48 tmp
drwxr-xr-x. 12 root root  100 Jan  6 07:48 usr
drwxr-xr-x. 18 root root  154 Jan  6 07:48 var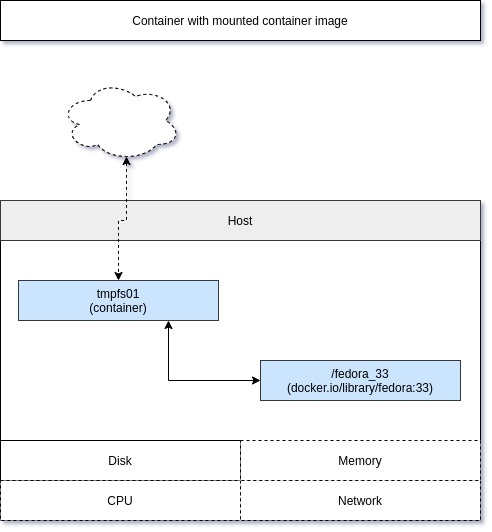
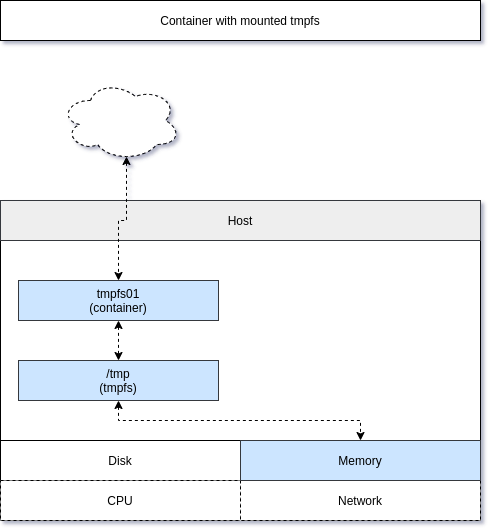
Mounting a tmpfs
Mounting a tmpfs can be very handy, if your application needs a proper tmp file system. Some applications are using /tmp or /var/tmp to create temporary files for uploads, sessions and more. A tmpfs will avoid that this data will be written to the underlying host system.
Let's see this working in an example. First, check how it looks for a default fedora container.
# Start a simple container
$ podman run -it --rm --name tmpfs01 fedora:33 bash

# Check the attached filesystems
[root@4bd6e04d986d /]# df -h
Filesystem      Size  Used Avail Use% Mounted on
fuse-overlayfs  953G  212G  740G  23% /
tmpfs            64M     0   64M   0% /dev
tmpfs           1.6G  468K  1.6G   1% /etc/hosts
shm              63M     0   63M   0% /dev/shm
devtmpfs        7.7G     0  7.7G   0% /dev/tty
The output will be slightly different, but let me explain. The following mounts are existing in the container:
# the root file system in the container
# showing the available space on the host disk
/

# the device directory, used for attached devices
/dev

# a mounted resolve file
/etc/hosts

# a shared memory device
/dev/shm

# a virtual tty device (since we started the container with -t)
/dev/tty
Now let's see the difference to an additional tmpfs.
# Start a container with additonal tmpfs for /tmp
$podman run -it --rm --name tmpfs01 \
  --mount type=tmpfs,tmpfs-size=512M,destination=/tmp \
  fedora:33 bash

# Check the attached filesystems
[root@6f73456c95dc /]# df -h
Filesystem      Size  Used Avail Use% Mounted on
fuse-overlayfs  953G  212G  740G  23% /
tmpfs           512M  4.0K  512M   1% /tmp
tmpfs            64M     0   64M   0% /dev
tmpfs           1.6G  468K  1.6G   1% /etc/hosts
shm              63M     0   63M   0% /dev/shm
devtmpfs        7.7G     0  7.7G   0% /dev/tty
Most of the mounts are the same as in the example before, but there is an additional /tmpmount, which is limited to 512 MB disk space. So, what does this mean? Let's assume our test container is a heavily used file server. People are uploading and downloading a lot of data. Depending on the software, these files will be stored in /tmp and may fill up the disk of the host. Using a tmpfs can avoid issues since the space is limited to 512 MB, and it is not filling the host disk.
Documentation
There is more to volumes and these links may be helpful, if you need more options.
- https://docs.podman.io/en/latest/volume.html
- https://docs.podman.io/en/latest/markdown/podman-run.1.html#volume-v-source-volume-host-dir-container-dir-options
- https://docs.podman.io/en/latest/markdown/podman-run.1.html#mount-type-type-type-specific-option
- https://docs.podman.io/en/latest/markdown/podman-run.1.html#volumes-from-container-options
Conclusion
In the last 2 articles about podman container, I tried to give an overview how volumes and mounts work in a container world. Getting data in or out of a container is quite easy and is often used to persist data, limit usage permissions and control resource allocation.


