Fedora - Minikube
Before digging into Kubernetes, you will need a minimal Kubernetes Setup. Such a setup should spin up fast, should work like a real cluster, and hopefully integrate well in other tools. For me, Minikube fulfills these needs, and you can run it on Fedora, too.


Before digging into Kubernetes, you will need a minimal Kubernetes setup. Such a setup should spin up fast, should work like a real cluster, and hopefully integrate well in other tools. For me, Minikube fulfills these needs, and you can run it on Fedora, too.
Why local tools?
I am one of these guys, who thinks like a craftsman.
Assume you are having an electrician that wants to repair your lighting. For sure, he will bring everything he needs to work. Screwdrivers, spare cables and more will be in his toolbox.
For me, this is true for IT professions, too. If I am having my notebook, I have everything to get started. Having a local Kubernetes was only logical for me.
The benefits of a local setup can be summarized in some simple statements.
- You can get started immediately.
- You don't need to connect to something.
- You do not depend on stable WAN connections.
- You can test without interfering with other systems.
- You will learn a lot.
Fedora
As you might know, Fedora is my go-to-distribution when it comes to Desktop, Workstations and Home usage. I am also having Fedora in some development environments and testing areas.
You will get a mostly vanilla, recent, solid, well maintained and community backed distribution. There are some smaller things one needs to get used to like SELinux or firewalld. I have written some more detailed articles about Fedora here, here and here.
Minikube
There are many ways to have a small local Kubernetes setup. You can spin up a VM and install something like vanilla Kubernetes, k3s or k0s in it. You can use Rancher Desktop or Kubernetes in Docker. Minikube has some benefits, where others just cannot compete:
- It's officially backed by the Kubernetes project.
- It supports different backend drivers like KVM, Docker, Podman, etc.
- You can enable and disable plugins (like an ingress) on the fly.
- It automatically creates necessary configurations for the client.
- It adds some nice tools for developers.
- It's just a binary.
- It works on Windows, Mac and Linux.
Therefore, I think it is a wonderful way to start with Kubernetes and getting used to some concepts and terminology.
Setup and first Deployment
It's finally time to set it up and play a bit with Kubernetes. Ready? Here we go.
Setup Minikube
First, we need to download the binary and make it executable. This can be done in two ways.
User Setup
You can have Minikube for your user only. This is quite useful, if you don't want to share the binary with other users on your machine.
# Download Minikube
$ wget https://storage.googleapis.com/minikube/releases/latest/minikube-linux-amd64 -O ~/.local/bin/minikube

# Make executable
$ chmod 0755 ~/.local/bin/minikube
System Wide Setup
You can also store Minikube for all users/system-wide. The File Hierarchy Standard recommends the proper path for the same.
# Download Minikube
$ wget https://storage.googleapis.com/minikube/releases/latest/minikube-linux-amd64 -O /usr/local/bin/minikube

# Make executable
$ sudo chmod 0755 /usr/local/bin/minikube
Additional Steps
It doesn't matter where you stored Minikube. In both cases, you need to do some additional steps to get it working. I am opting for the "Podman way", which will use Podman to start and enable your Minikube Kubernetes instance.
Unfortunately, you need to have "passwordless sudo" to have Minikube properly working with Podman. Fortunately, this is really easy to achieve.
# Start an editor

$ sudo nano /etc/sudoers.d/podman
You need to add the below line to this config file and adapt it to your needs. The below example allows all users, who can use sudo anyway, to use the Podman command without providing the password. You can also change %wheel to your username, to limit it even further.
# Allow passwordless podman for sudoers

%wheel ALL=(ALL) NOPASSWD: /usr/bin/podmanPlease double-check that everything looks properly. Afterwards, you need to save your changes.
Open up a new terminal, and you should be able to run sudo podman ps, without providing your user password.
# Testing

$ sudo podman ps
CONTAINER ID  IMAGE       COMMAND     CREATED     STATUS      PORTS       NAMES
There are much more ways to use Minikube. In case you want to use Docker or libvirt as the backend, please check out the installation documentation.
Working with Minikube
Starting your new Kubernetes instance is pretty easy.
# Configure Minikube to use Podman
$ minikube config set driver podman
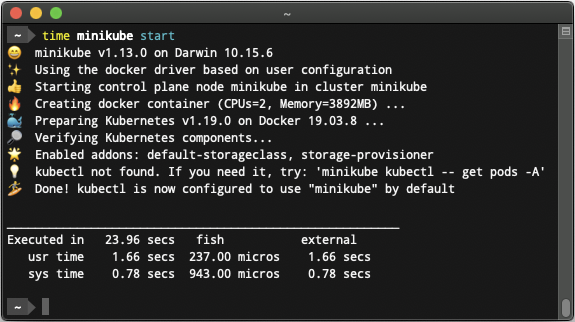
# Start a new instance
$ minikube start
😄 minikube v1.23.0 on Fedora 34
✨ Using the podman driver based on user configuration
👍 Starting control plane node minikube in cluster minikube
🚜 Pulling base image ...
E0922 18:43:35.954693 285432 cache.go:200] Error downloading kic artifacts: not yet implemented, see issue #8426
🔥 Creating podman container (CPUs=2, Memory=3900MB) ...
🐳 Preparing Kubernetes v1.22.1 on Docker 20.10.8 ...
▪ Generating certificates and keys ...
▪ Booting up control plane ...
▪ Configuring RBAC rules ...
🔎 Verifying Kubernetes components...
▪ Using image gcr.io/k8s-minikube/storage-provisioner:v5
🌟 Enabled addons: storage-provisioner, default-storageclass
🏄 Done! kubectl is now configured to use "minikube" cluster and "default" namespace by default
If you have kubectl on your machine, you can use it already to check the Minikube Kubernetes instance. If not, no problem. Minikube provides everything you need.
# Check the instance with minikube

$ minikube kubectl get nodes
NAME       STATUS   ROLES                  AGE   VERSION
minikube   Ready    control-plane,master   2m    v1.22.1

# Check the instance with kubectl

$ kubectl get nodes
NAME       STATUS   ROLES                  AGE    VERSION
minikube   Ready    control-plane,master   2m	 v1.22.1
If you want to install kubectl on your machine, you can find a simple guide here.
Nevertheless, let's continue with the small guide. You can also stop and delete your Kubernetes instance.
# Stop the Kubernetes instance

$ minikube stop

# Delete the Kubernetes instance

$ minikube delete
Since Minikube spins up in some seconds, it is perfectly fine to start a new instance at the beginning of the work and delete it afterwards.
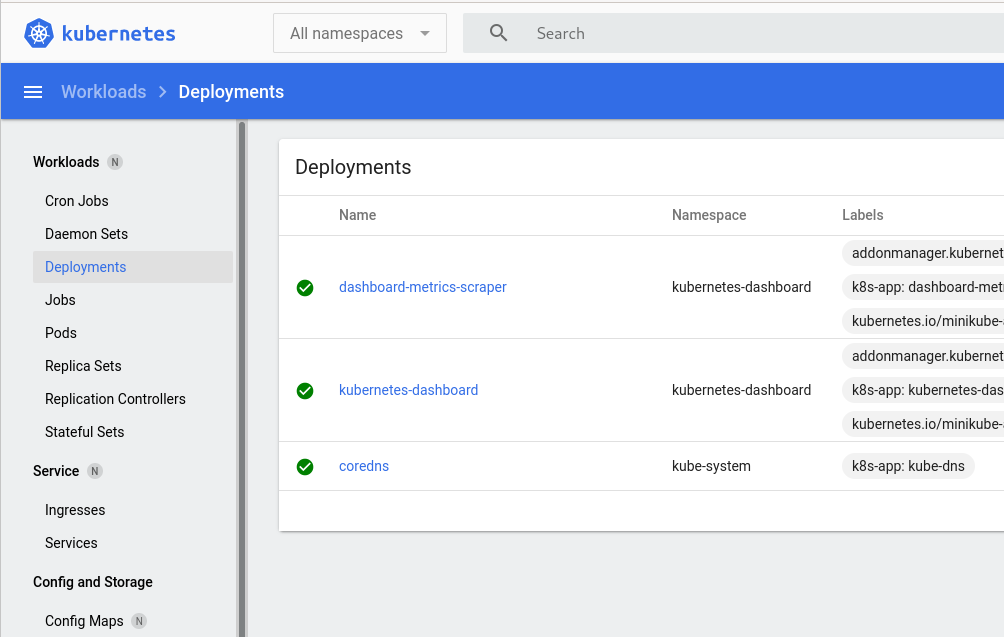
You can also start and check the dashboard of a running instance.
# Connect to the dashboard

$ minikube dashboard
🔌  Enabling dashboard ...
    ▪ Using image kubernetesui/dashboard:v2.1.0
    ▪ Using image kubernetesui/metrics-scraper:v1.0.4
🤔  Verifying dashboard health ...
🚀  Launching proxy ...
🤔  Verifying proxy health ...
🎉  Opening http://127.0.0.1:42697/api/v1/namespaces/kubernetes-dashboard/services/http:kubernetes-dashboard:/proxy/ in your default browser...
This will open up the default browser and show the below dashboard.
You can also enable additional functionality, that needs some extra-work on a real setup, very easily. Enabling an Ingress is just a command away.
# Enable Ingress

$ minikube addons enable ingress
    ▪ Using image k8s.gcr.io/ingress-nginx/controller:v1.0.0-beta.3
    ▪ Using image k8s.gcr.io/ingress-nginx/kube-webhook-certgen:v1.0
    ▪ Using image k8s.gcr.io/ingress-nginx/kube-webhook-certgen:v1.0
🔎  Verifying ingress addon...

# List addons

$  minikube addons list
|-----------------------------|----------|--------------|-----------------------|
|         ADDON NAME          | PROFILE  |    STATUS    |      MAINTAINER       |
|-----------------------------|----------|--------------|-----------------------|
| ambassador                  | minikube | disabled     | unknown (third-party) |
| auto-pause                  | minikube | disabled     | google                |
| csi-hostpath-driver         | minikube | disabled     | kubernetes            |
| dashboard                   | minikube | enabled ✅   | kubernetes            |
| default-storageclass        | minikube | enabled ✅   | kubernetes            |
| efk                         | minikube | disabled     | unknown (third-party) |
| freshpod                    | minikube | disabled     | google                |
| gcp-auth                    | minikube | disabled     | google                |
| gvisor                      | minikube | disabled     | google                |
| helm-tiller                 | minikube | disabled     | unknown (third-party) |
| ingress                     | minikube | enabled ✅   | unknown (third-party) |
...
You can even add more nodes to have a small cluster setup.
# Add node

$ minikube node add
😄  Adding node m02 to cluster minikube
❗  Cluster was created without any CNI, adding a node to it might cause broken networking.
E0922 19:59:15.048978  367803 register.go:141] unexpected first step: ""
👍  Starting node minikube-m02 in cluster minikube
E0922 19:59:15.049096  367803 register.go:141] unexpected first step: ""
🚜  Pulling base image ...
E0922 19:59:15.049661  367803 cache.go:200] Error downloading kic artifacts:  not yet implemented, see issue #8426
E0922 19:59:15.049840  367803 register.go:141] unexpected first step: ""
🔥  Creating podman container (CPUs=2, Memory=2200MB) ...\ E0922 19:59:25.432915  367803 register.go:141] unexpected first step: ""

🐳  Preparing Kubernetes v1.22.1 on Docker 20.10.8 ...\ E0922 19:59:32.749511  367803 register.go:141] unexpected first step: ""

🔎  Verifying Kubernetes components...
🏄  Successfully added m02 to minikube!

# List nodes

$ minikube node list
minikube	192.168.49.2
minikube-m02	192.168.49.3

$ minikube kubectl get nodes
NAME           STATUS   ROLES                  AGE     VERSION
minikube       Ready    control-plane,master   2m52s   v1.22.1
minikube-m02   Ready    <none>                 92s     v1.22.1
What's next?
Let's be honest, this was just a very fast runover of Minikube. You might ask yourself:
- "What can I do with it?"
- "How to deploy stuff to it?"
- "How can I set up my App on it for testing and development?"
For the very inpatient of you, please check out the handbook for Minikube, It provides lots of resources to get started and work with Minikube.
I will ensure to add much more Kubernetes related articles in the near future and demonstrate how you can deploy stuff on Minikube (and Kubernetes in general), explain the core concepts and demonstrate how you can enhance your workflow with some additional tools and helpers.
I will also demonstrate how you can use Ansible with Kubernetes and much more.
Docs & Links
When it comes to Kubernetes, you will find tons and tons of resources on the web. Be aware, that Kubernetes is very fast, when it comes to changes. An article which was working 2 years ago may no longer work in recent Kubernetes versions. Sticking to the official docs is strongly recommended. The below links are what I am often looking at:

Conclusion
Minikube is an awesome little helper, when it comes to local development environments. You don't need to take care of "Setting up Kubernetes", but work on your deployments, code and more.
It works perfectly fine with Fedora and Podman, but can also facilitate other technologies like libvirt/KVM or VirtualBox.
Do you know alternatives, that I forgot? Is there some stuff, that you really, really want to know? Please feel free to give me a ping via hello@while-true-do.io.


