Git - Next Steps
Some time ago, I published the article "Git - Getting Started" to get you started with Git and Source Code Management. Now, let's have a look how to enhance your workflow with branching, rebasing, squashing and merging.


Some time ago, I published the article "Git - Getting Started" to get you started with Git and Source Code Management. Now, let's have a look how to enhance your workflow with branching, rebasing, squashing and merging.
Branches
The first thing which needs some explanation is: "What the hell is a branch?" immediately followed by "Why the hell do we need them?". In this section, I will focus on these questions.
Branching concept
In the "Git - Getting Started" article, we focused on the initial steps when it comes to working with Git. In a team, you will have a different situation. Let's assume Alice is working on Feature A and Bob is working on Feature B. In parallel and Carol is fixing an issue from the QA team.
It's basically impossible to work on the very same code without running into conflicts, if you are not separating your code from the others. Locking a file for a week or more is also not an option, since others may need to work on the same file. This is where branches come in handy.
In a typical Git repo, you will find at least the main branch (formerly master). It is very common, that you also find different branches for features and fixes.
This way, each developer has some "copy" where he is working on. If he needs to work on a file, it is not blocked by some other team member. After finishing the development, the branch will be merged to the main branch and can be used for production deployments.
There are more sophisticated branching strategies, but for now let's stick to a single main branch with feature/fix branches for each feature/fix and see the needed commands in an example.
Prerequisites
To follow the complete guide, you will need a repository with the below content. It is not needed to have a remote repository, but you can create one on GitLab, Bitbucket or GitHub for free, if you want to try this already.
Let's create our project directory and initialize it.
# Create project directory
$ mkdir git-next-steps
$ cd git-next-steps

# Create some files
$ mkdir web
$ touch web/index.html
$ mkdir web/css
$ touch web/css/main.css
$ touch Dockerfile
$ touch README.md
You will end up with a directory tree like below:
$ tree
.
├── Dockerfile
├── README.md
└── web
    ├── css
    │   └── main.css
    └── index.html
The content of the created files can be added with any editor. Just copy and paste the below to the proper files.
<!doctype html>
<html lang="en">
<head>
    <title>Git - Next Steps</title>
    <link rel="stylesheet" href="css/main.css" />
</head>
<body>
    <h1 class="page-title">Git - Next Steps</h1>
    <p>Let's branch, merge and rebase.</p>
</body>
</html>
FROM docker.io/library/httpd:2.4.48

COPY web/ /usr/local/apache2/htdocs/.page-title{
font-size: 4em;
color: #ccc;
}# Git - Next Steps
Let's branch, merge and rebase.
## Build
To build the container, you need to run:
```
# Docker
docker build -t localhost/git-next-steps .
# Podman
podman build -t local/git-next-steps .
```
## Run
Running the container can be done via:
```
# Docker
docker run -p 8080:80 localhost/git-next-steps
# Podman
Pocker run -p 8080:80 localhost/git-next-steps
```
### Test
Point your browser to "http://IP-ADDRESS:8080".Afterwards, you can initialize your repository and start with the guide below.
# Initialize repository and commit
$ git init
$ git add .
$ git commit -m "Initial commit"Branch
So, after a bit of preparation, we can start to branch, develop, commit and merge changes to the main branch. First, let's create a branch for Feature A and Feature B. Both can be developed separately.
Normally, you will have the branches on different machines, but for the sake of this guide, we will imagine that we are the developers Alice (Feature A) and Bob (Feature B).
# Show branches
$ git branch
* main
# Create branches
$ git branch feature-a
$ git branch feature-b
$ git branch fix-c
# Show branches
$ git branch
feature-a
feature-b
fix-c
* main
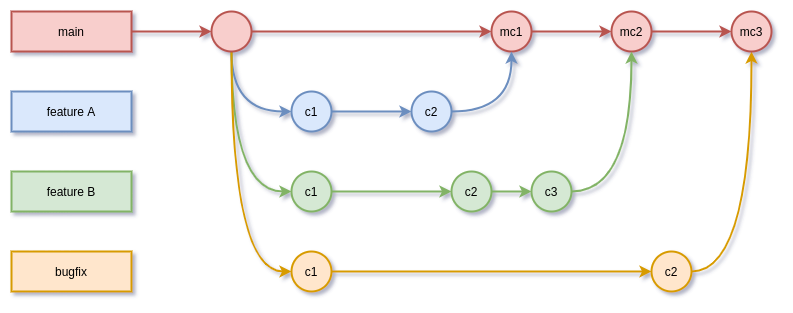
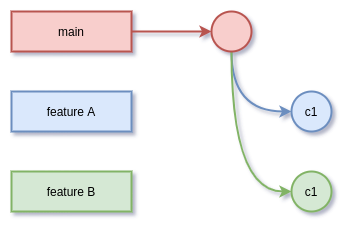
Picturing this, you will have something like this.
Alice
Let's image we are Alice, and we want to work on our branch. It's a simple feature, that will make the page-title of our website better readable. First, you need to check out the new branch, where you want to work on.
$ git checkout feature-a
Switched to branch 'feature-a'Alice is now changing the main.css file and adjust it according to the below example:
.page-title{
font-size: 3em;
color: #a3a;
}
Alice will add and commit the changes afterwards.
# add changes
$ git add web/css/main.css
# commit changes
$ git commit -m "Feature: Changed page title according to style guide"That's already it for now.
Bob
Bob has the task to add some styling, which will make the website centered and the content 920px wide. This is quite easy, and he will immediately dig into the task on his new branch.
# checkout branch
$ git checkout feature-b
Now Bob will change two files.
.page-title{
    font-size: 4em;
    color: #ccc;
}
.center{
width: 920px;
margin: 0 auto;
}<!doctype html>
<html lang="en">
<head>
<title>Git - Next Steps</title>
<link rel="stylesheet" href="css/main.css" />
</head>
<body>
<div class="center">
<h1 class="page-title">Git - Next Steps</h1>
<p>Let's branch, merge and rebase.</p>
</div>
</body>
</html>
As you can see, the changes from Alice are not visible in his branch, since he branched before Alice took care of the style-guide. Bob just added his stuff and commits it.
# Validate branch
$ git branch
feature-a
* feature-b
fix-c
main
# Add and commit
$ git add .
$ git commit -m "Feature: centered content in 920px container"
Compare
Now, we will have 3 different branches with different content. To see the difference, you can check out each of them and compare the main.css file.
# Check main
$ git checkout main
$ cat web/css/main.css
.page-title{
font-size: 4em;
color: #ccc;
}
# Check feature-a
$ git checkout feature-a
$ cat web/css/main.css
.page-title{
    font-size: 3em;
    color: #a3a;
}
# Check feature-b
$git checkout feature-b
$ cat web/css/main.css
.page-title{
    font-size: 4em;
    color: #ccc;
}

.center{
  width: 920px;
  margin: 0 auto;
}
You can also open the website in a browser xdg-open web/index.html, checkout the branches and hit F5 for each of them to see the differences.
Merge
Now that everybody has done the work, you want to merge the changes. On providers like GitHub, GitLab or Bitbucket, you will find the option to make a pull-request or merge-request, so the owner of the repository can take care of the merge. For this tutorial, we will do it manually.
As the owner/maintainer/merger, you can do a merge manually with the below commands.
# Ensure you are on the destination branch
$ git checkout main

# Merge feature-a
$ git merge feature-a

# Merge feature-b
$ git merge feature-b
Maybe, you will need to provide a commit message for one or both, but you can just confirm the default message for now. After the merge of both branches, you will have a main branch that contains both features, and you can have a look at the files or point your browser to the index.html again xdg-open web/index.html.
There are different merging strategies (merge commit, fast-forward, squash merge, etc.). For now, I will just give a brief overview of these.
- fast-forward: This is the default merging strategy in most Git clients. The new feature will be merged to the main branch without an additional commit and in the Git graph, it will look like as if you worked directly on the main branch.
- merge-commit: This is very common in many OpenSource project and team projects. Each merge will be represented by an additional commit to indicate that a merge occurred.
- squash-commit: This is also quite common in many projects. The commit messages from the branch will be squashed, and the main branch will be updated with a single commit message.
I strongly prefer the merge-commit strategy, since it provides the best control and transparency. If you want to learn more about these strategies, please have a look here and here.
Rebase
Very often you will work on a feature or a fix for a longer time and provide multiple commit messages. Furthermore, it may happen that the main branch will be updated with new content during your development and the merger may run into conflicts, that can be avoided.
Fortunately, there is a way to update your branch with the changes from another branch and also review your own commits and pick/squash or drop them. This functionality is very common and sometimes mandatory for team work.
In the above example, we opened a branch fix-c, which is still idling around and Carol hasn't started the development, yet. Let's take care of this.
# checkout fix-c
$ git checkout fix-c
QA detected, that the README.md needs an additional description section and contact option. So, we will update the README.md as described below.
# Git - Next Steps

Let's branch, merge and rebase. A simple example to
demonstrate how website development is done in a team.

## Build

To build the container, you need to run:

```
# Docker
docker build -t localhost/git-next-steps .

# Podman
podman build -t local/git-next-steps .
```

## Run

Running the container can be done via:

```
# Docker
docker run -p 8080:80 localhost/git-next-steps

# Podman
Pocker run -p 8080:80 localhost/git-next-steps
```

## Test

Point your browser to "http://IP-ADDRESS:8080".

## Contact

- mail: demo@example.com
Let's again add and commit the changes.
# Add changes
$ git add README.md

# Commit changes
$ git commit -m "Fix: README.md needs description and contact."
We are having the situation, that Carol's fix branch is not aware of any changes made so far. QA also gave us a call, that the new description must also be reflected in the index.html. So, Carol continuous the work and changes the file as below.
<!doctype html>
<html lang="en">
<head>
    <title>Git - Next Steps</title>
    <link rel="stylesheet" href="css/main.css" />
</head>
<body>
    <h1 class="page-title">Git - Next Steps</h1>
    <p>Let's branch, merge and rebase. A simple example to
    demonstrate how website development is done in a team.</p>
</body>
</html>
And now another add/commit.
$ git add web/index.html
$ git commit -m "Fix: index.html also needs new description"
To avoid conflicts with the already made changes from our colleagues and also review our commits, we can run a rebase.
# Rebase interactively
$ git rebase -i main
We will end up with an editor, looking something like this:
pick c4e1ea6 Fix: README.md needs description and contact.
pick 875f120 Fix: index.html also needs new description
The description below explains the options, we are having. Carol decides to squash both commit messages, since it is basically the same fix.
pick c4e1ea6 Fix: README.md needs description and contact.
squash 875f120 Fix: index.html also needs new description
The rebase is informing us about a conflict in the index.html file.
git rebase -i mainAuto-merging web/index.html
CONFLICT (content): Merge conflict in web/index.html
So, we need to have a look at the index.html again and check what is going on:
<!doctype html>
<html lang="en">
<head>
    <title>Git - Next Steps</title>
    <link rel="stylesheet" href="css/main.css" />
</head>
<body>
<<<<<<< HEAD
    <div class="center">
      <h1 class="page-title">Git - Next Steps</h1>
      <p>Let's branch, merge and rebase.</p>
    </div>
=======
    <h1 class="page-title">Git - Next Steps</h1>
    <p>Let's branch, merge and rebase. A simple example to
    demonstrate how website development is done in a team.</p>
>>>>>>> 875f120 (Fix: index.html also needs new description)
</body>
</html>This is a so-called diff-view and presents information about the conflict. You just need to adjust the file, so it presents the final result.
<!doctype html>
<html lang="en">
<head>
    <title>Git - Next Steps</title>
    <link rel="stylesheet" href="css/main.css" />
</head>
<body>
    <div class="center">
        <h1 class="page-title">Git - Next Steps</h1>
        <p>Let's branch, merge and rebase. A simple example to
        demonstrate how website development is done in a team.</p>
    </div>
</body>
</html>
And continue to rebase afterwards.
# Continue rebase
$ git add web/index.html
$ git rebase --continue
You will be prompted a last time to adjust your final commit message, and the changes can be merged from the merger without additional conflicts.
You may ask yourself: "Why should I do this?" and the answer is quite simple: "The merger may not have knowledge about potential conflicts and desired output after the merge. So, he has to ask you anyway, and this will take time. It's easier, if the developer takes care of conflict handling and the final result.
Forks
Finally, I want to talk about forks. The word often has a bad tase, but this is entirely not true. Forking something is not a bad thing. You may want to provide new changes to a project, but you don't have permissions to push changes or open branches. This is where forks are very handy.
A fork is (very simplified) just a branch, located somewhere else. You can merge and rebase forks the same way as you are doing with branches and immediately start to work on somebody else's code.
If you are done, just open a pull-request/merge-request and the owner will be informed and can take care.
Docs & Links
Git provides a ton of documentation, and you can find very nice articles and detailed guidelines about branching and merging.

Conclusion
Now that you can handle branches, merges and rebasing, it's just a matter of practicing and using these features. It's very easy to work in a team, if everybody is having branches for single features and fixes.
In some future articles, I will provide additional background and strategies for large communities and development groups.


