Spotlight - Steampunk Spotter (Ansible)
Ansible is easy, simple, and powerful, right? Sure, and it is a pain to get it right. There are various tools that are meant to help you with Ansible. Let's take a look at Steampunk Spotter, a quality assurance tool, that makes it easy to improve your Ansible playbooks, roles, and collections.

Ansible is easy, simple, and powerful, right? Sure, and it is a pain to get it right. There are various tools that are meant to help you with Ansible. Let's take a look at Steampunk Spotter, a quality assurance tool, that makes it easy to improve your Ansible playbooks, roles, and collections.
Let's test some roles and see how it performs. Shall we?
Ansible
Ansible is the Open Source automation software for small use cases or entire cloud ecosystems. With just a bit of YAML, you can start to automate your package installations, network configuration or Kubernetes on AWS.
In the past, I wrote a couple of articles about Ansible and also took a look at the ecosystem occasionally. In case you never heard of Ansible, you should start with one of my "Getting Started" articles.
Steampunk Spotter
I am not the biggest fan of telling people how awesome something is. Therefore, let me demonstrate how I am using spotter and how it can help you, too.
Corpus delicti
For our small experiment, we will need some code that shall be tested. Below, you can find a simple playbook to install Cockpit on an AlmaLinux OS machine. In case you never heard about Cockpit and AlmaLinux OS, I want to share "Spotlight - Cockpit Project" and "Spotlight - AlmaLinux" with you.
Well, this is our test playbook.
---
# playbook.yml

- name: "Install and configure Cockpit"
  hosts: "all"
  become: true

  handlers:

    - name: "Start cockpit"
      ansible.builtin.service:
        name: "cockpit.socket"
        state: "started"
      enabled: true

  tasks:

    - ansible.builtin.package:
        name: "cockpit"
      become: true
      notify: Start cockpit

    - name: "Open firewall"
      ansible.builtin.firewalld:
        service: cockpit
        immediate: true
        state: enabled
playbook.yml
Well, this snippet contains some super visible and some (maybe) unwanted errors and styling issues. Could you spot everything? As a challenge, let's compete your counting to some other tools, including spotter. Shall we?
Registration
Steampunk Spotter requires a registration, so you can use it. So, it is not Open Source, but there is a free plan available. The free plan should be sufficient for most hobby projects.
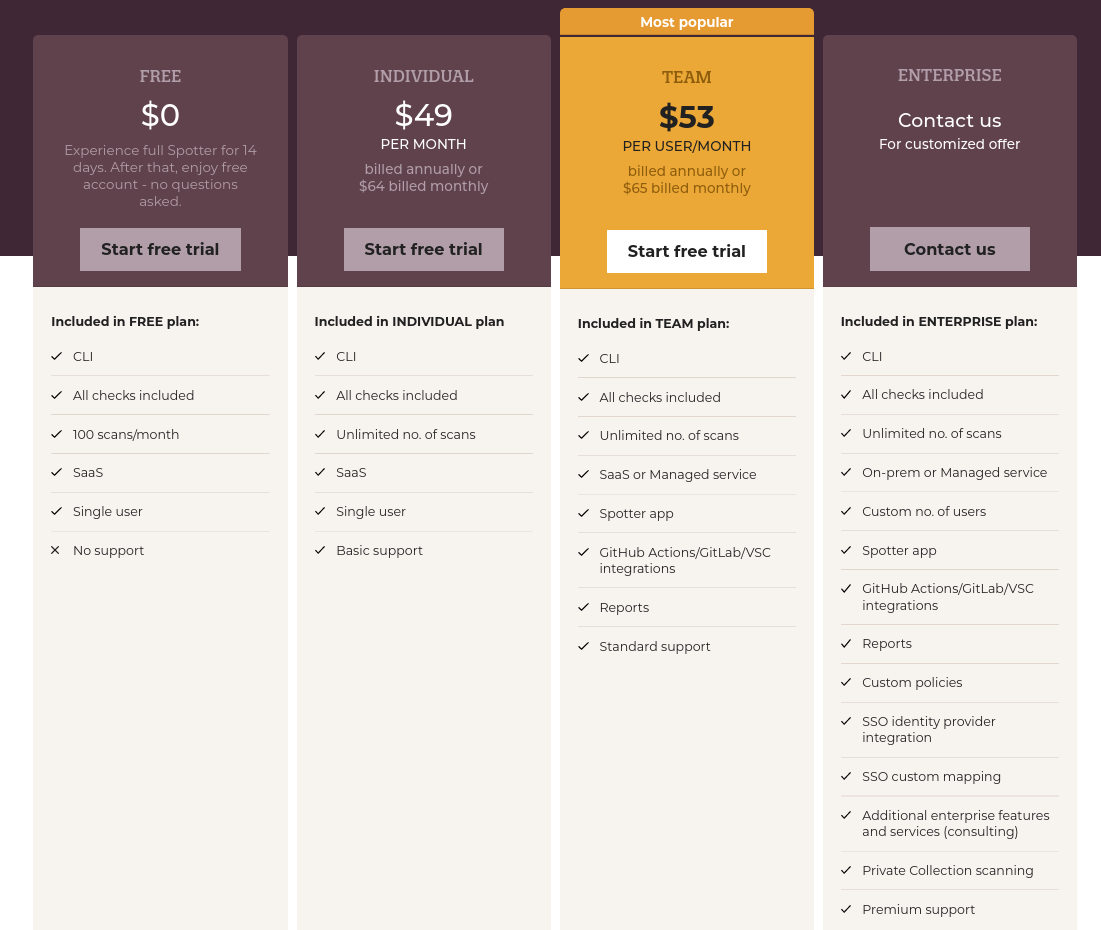
Even though, the pricing table states, that you don't have integrations for CI/CD, it's pretty easy to use the CLI tool in CI/CD. This is also the only tool, I will review today.
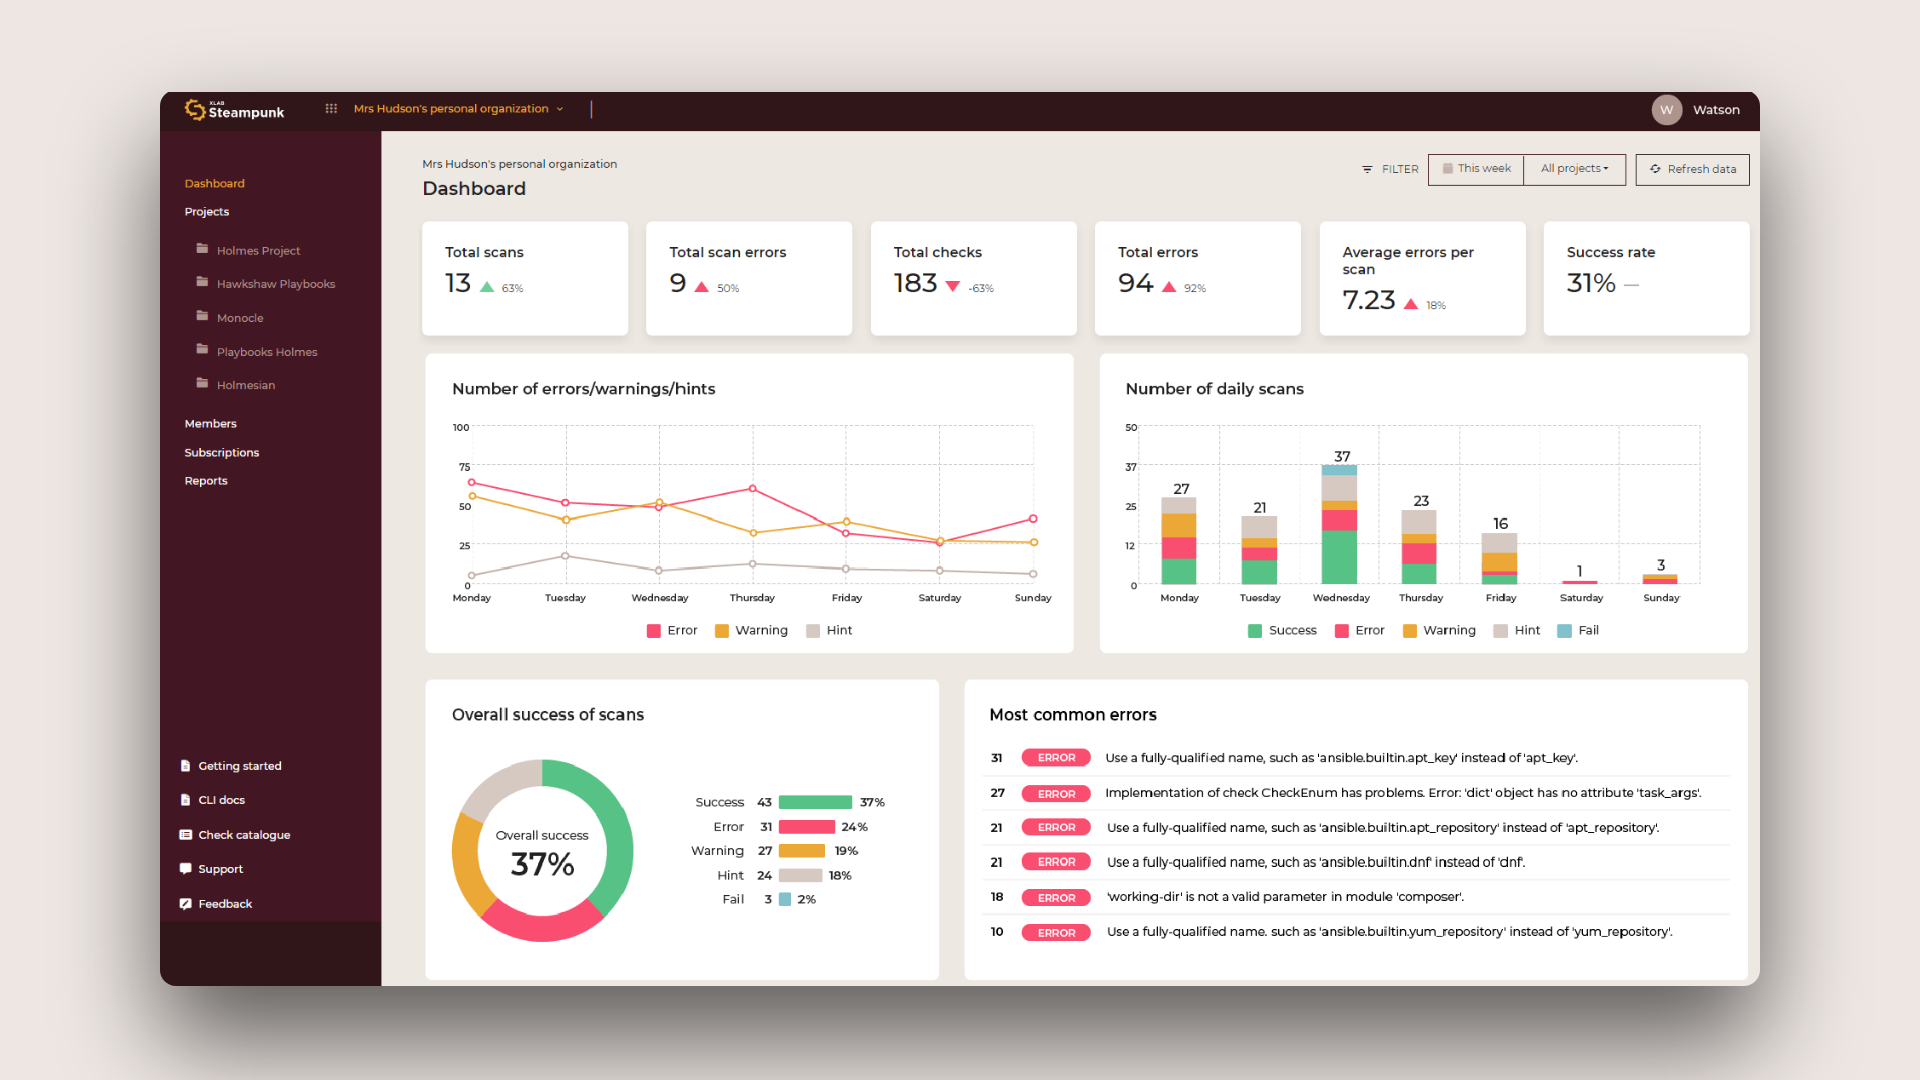
So, there is one big thing missing in the free account, the reports. I took a glance during the spotter challenges, but otherwise never used it. If you are into pictures, graphics and metrics, this might be something you are interested in.
Anyway, let's get the registration out of the way. Go to https://steampunk.si/spotter/ and hit the "Start for free" button. There is no credit card required, just your mail and a password.
After this is done, let's continue with the installation.
Installation
Installing the CLI tool is suuuuper easy. If you already have Ansible installed, there should be no way, you will have issues with spotter. If you don't, let's create a new Python Virtualenv together.
# Create virtualenv
$ python -m venv .venv

# Activate virtualenv
$ source .venv/bin/activate

# Install Ansible
$ pip install ansible

# Install Spotter
$ pip install steampunk-spotterpip install setuptools.Run Test
Before running a test, you need to log in to your Steampunk Spotter account and receive an API token. Just go to your settings and copy the new token.
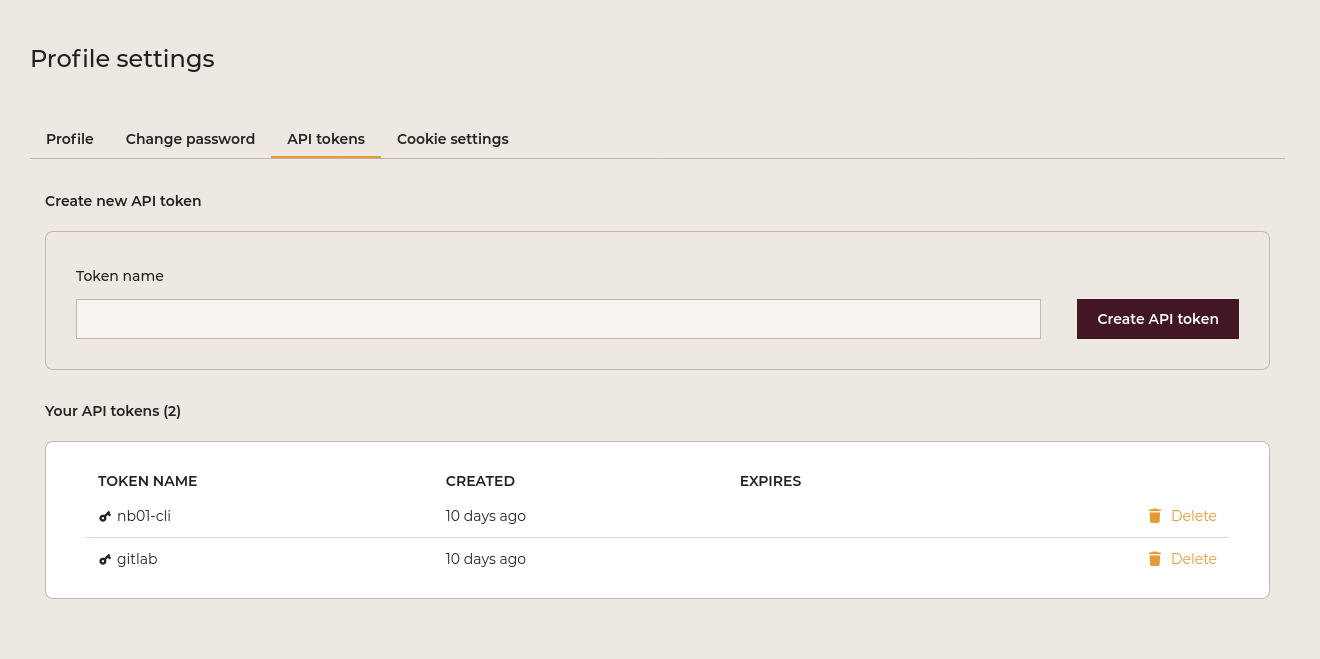
This token is needed to log in to your Spotter account, which can be done with the just installed CLI.
# Log in to spotter
$ spotter --api-token YOURTOKEN login
This will ensure that spotter can connect to your account and you can run scans. The login token will be stored in ~/.config/steampunk-spotter.
And finally, you can run a test:
# Run a scan
$ spotter scan playbook.yml

playbook.yml:10:7: ERROR: [E900] Cannot find module enabled information in the database. Is this a custom module not published on Ansible Galaxy?.

playbook.yml:18:7: HINT: [H1600] Tasks should always be named using the name parameter.

playbook.yml:23:7: ERROR: [E903] Use a fully-qualified name, such as ansible.posix.firewalld instead of ansible.builtin.firewalld. View docs at https://docs.steampunk.si/plugins/ansible/posix/2.15.6/module/firewalld.html.

playbook.yml:23:7: HINT: [H1900] Required collection ansible.posix is missing from requirements.yml or requirements.yml is missing.
------------------------------------------------------------------------
Spotter took 0.434 s to scan your input.
It resulted in 2 error(s), 0 warning(s) and 2 hint(s).
Overall status: ERROR
Well, this found 4 items, that we might need to address. The first one is a bit weird, since it's just a badly indented line. The second finding is pretty valid. The third one is super awesome, since it highlights an issue with a legacy module usage. The last one even explains, that we should add a proper requirements.yml.
So far, this seems to highlight something. But... how does it compare to other tools?
Other tools
If you develop Ansible content, you might know already some tricks to find obvious issues before executing your playbooks or publishing roles. Let's see how these compare to spotter in the above example.
yamllint
The YAML specification has lots freedom, but can be tested, too. The yamllint command is available in PyPi and can be installed with just a single command. I am reusing our above created Python Virtualenv.
# Install yamllint
$ pip install yamllint
And now, we can run the linter.
# Run the lint
$ yamllint playbook.yml
And here goes ... nothing. Our YAML is valid.
ansible-lint
Let's see if ansible-lint, the official linting tool for Ansible will find more issues. Again, we can install this in the Python Virtualenv.
# Install ansible-lint
$ pip install ansible-lint

# RUn the test
$ ansible-lint playbook.yml
WARNING  Listing 1 violation(s) that are fatal
syntax-check[specific]: conflicting action statements: ansible.builtin.service, enabled
playbook.yml:10:7


                  Rule Violation Summary
 count tag                    profile rule associated tags
     1 syntax-check[specific] min     core, unskippable

Failed: 1 failure(s), 0 warning(s) on 1 files.
Well, this one stops already at the badly indented line that spotter found, too. Let's fix this one line for a moment and run again.
# ansible-lint with fixed line 14
$ ansible-lint playbook.yml
WARNING  Listing 2 violation(s) that are fatal
name[missing]: All tasks should be named.
playbook.yml:18 Task/Handler: package name=cockpit

fqcn[canonical]: You should use canonical module name `ansible.posix.firewalld` instead of `ansible.builtin.firewalld`.
playbook.yml:23 Task/Handler: Open firewall

Read documentation for instructions on how to ignore specific rule violations.

                Rule Violation Summary
 count tag             profile    rule associated tags
     1 name[missing]   basic      idiom
     1 fqcn[canonical] production formatting

Failed: 2 failure(s), 0 warning(s) on 1 files. Last profile that met the validation criteria was 'min'.
Two more issues found, both also found by spotter, but that shouldn't be an issue.
syntax-check
Let's also check out the built-in syntax check in Ansible. Ansible is already existing, and you can just run the command.
# syntax check with the original code
$ ansible-playbook --syntax-check playbook.yml
[WARNING]: No inventory was parsed, only implicit localhost is available
[WARNING]: provided hosts list is empty, only localhost is available. Note that the implicit localhost does not match 'all'
ERROR! conflicting action statements: ansible.builtin.service, enabled

The error appears to be in '/var/home/dschier/Projects/temp/ansible-spotter/playbook.yml': line 10, column 7, but may
be elsewhere in the file depending on the exact syntax problem.

The offending line appears to be:


    - name: "Start cockpit"
      ^ here
Phew... this one just stopped without any usable hints. After fixing line 14, it found nothing.
Verdict
Well, Spotter found some things that the other tools haven't found, but also found duplicates. None of the tools highlighted issues with the consistency of quotes or that I am using become weirdly.
Anyway, adding it to my CI/CD pipeline is for sure. I am certain, that the Steampunk team will add more and more useful tests to the list, over the time.
Docs & Links
 XLAB Steampunk


Conclusion
So, should you use Steampunk spotter? I don't want to decide this for you. If 100 scans per month are sufficient for you, it is a nice free option that can be added without a lot of work. The value is there.
In case you want to have reporting, graphs and history of your scans, you may want to give the trial a shot and decide afterward, if it is worth the dollars.
But, let me know: Do you already use spotter? Do you use another tool? Which one? Do you even develop one? I would love to get in touch and maybe even make a blog about new learnings.


