Fedora - Home Server (Time, DHCP, DNS Server 2/2)
In the last article of our Home Server series, we tackled the deployment of a timeserver. This also provided us with some useful tooling to set up more container deployments. Let's continue on this approach and tackle DNS and DHCP.


In the last article of our Home Server series, we tackled the deployment of a timeserver. This also provided us with some useful tooling to set up more container deployments. Let's continue on this approach and tackle DNS and DHCP.
Intro
This series is explaining how we are setting up a home server from scratch. You can find links to the previous articles below.
- Intro & Concept
- Hardware & OS
- Automation
- Management
- Virtualization
- Container
- Time, DHCP, DNS Server
- Git Server
- File, Calendar, Contact Sync
- Application Dashboard
This time, we will automate more deployments. Let's go! :)
Technologies
Before going into the deployment, I have to introduce two core technologies. In case you already know what DNS and DHCP are, please feel free to skip this section.
DNS
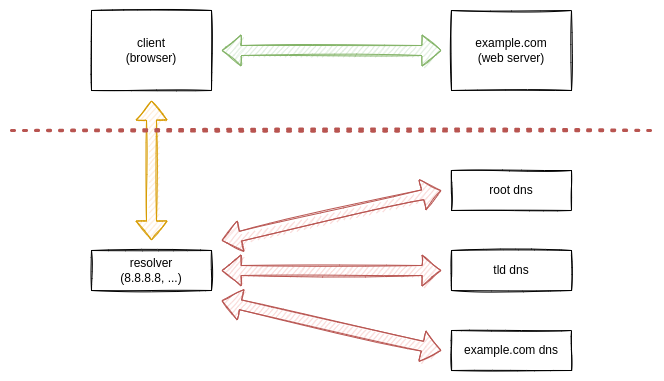
DNS (Domain Name System) is a technology, that resolves hostnames into IP Addresses. This seems, pretty low-tech, isn't it? Well, basically every browser request that you are performing uses DNS. I don't want to go into too many details, but it works pretty much like this.
- You will open a Browser and point to https://example.com
- Your Browser will go to the next available DNS recursive resolver, which is most likely from your ISP or another public machine
- The resolver queries a DNS root nameserver
- The root nameserver will provide you with the address for the Top Level Domain (TLD) nameserver (.com in our case)
- The resolver then makes a request to the TLD nameserver
- The TLD nameserver answers with the domain's nameserver
- The domain nameserver replies to the resolver with a valid IP address
- The browser makes a request to this IP address
As you can see, there are many requests happening. Very often, this allows your ISP to track what you are doing. But, this isn't the concern here. There is an even more interesting thing.
Ads on a website are typically coming from another server. For example, if you open a website (https://youtube.com), you may see advertisements. In general, these advertisements are located on another domain (youtube.adnet.com) or subdomain (ads.youtube.com). This allows us to use filters and exclude these ads from our network.
DHCP
You may not be aware of it, but basically every modern router already provides DHCP. In case you are using your Wi-Fi at home or LAN connection, you may already have a running DHCP service. This service is meant to provide you with a valid IP address in your local network.
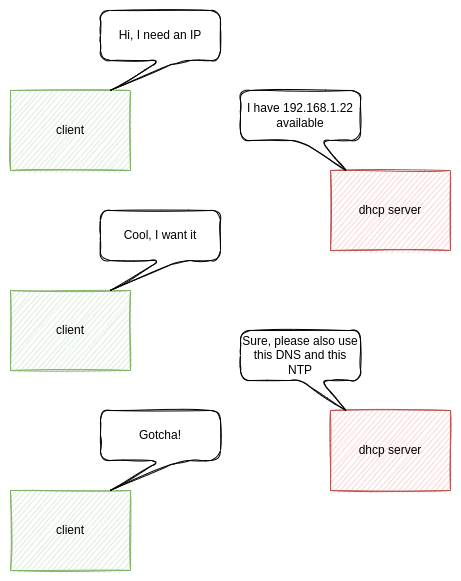
So... why should you bother to set up your own? Well, there is a lot that you can learn from your own setup. Getting some understanding of typical network services (like DHCP, DNS, NTP, etc.) is pretty valuable when it comes to debugging. But, there is also the benefit, that you can learn more about Podman and containers in general. In addition, you will get the benefits of a fully customizable behavior.
Since DHCP provides IP addresses already, it slowly became the standard way of promoting general network settings. If a new device joins your network, you are able to provide an IP address, but also a gateway, DNS servers, NTP servers and much more.
Furthermore, it is mandatory that your home server has a static IP Address on its own for this case. So, let's skip it for now.
Pi-hole
Pi-hole is meant to provide network wide ad blocking. This is done by offering a DNS caching server/forwarder and a list of filters. If you configure your machines (either manually or via DHCP) to use Pi-Hole as your DNS server, the service will take care of the rest.
- Cache of DNS requests
- Avoid DNS requests to know ad servers
- Improve network performance (by reducing DNS requests and traffic)
- Provide monitoring statistics
 telekrmor
So, it is an awesome choice for a DNS server for us. Optionally, you can also use the DHCP capabilities. Please check out the very detailed documentation of Pi-hole beforehand.
Setup (1)
For the setup, we are opting for a Podman container (yet again) and automate the deployment with Ansible (yet again).
Let's create a new Ansible playbook that deploys Pi-hole in a Podman container.
---
# ansible/playbooks/deploy_pihole_container.yml

- name: "Deploy pihole Container"
  hosts: "all"

  vars:
    pihole_net_name: "pihole"
    pihole_app_image_name: "docker.io/pihole/pihole"
    pihole_app_image_tag: "latest"
    pihole_publish_http: "80"
    pihole_publish_dnsu: "192.168.178.80:53"
    pihole_publish_dnst: "192.168.178.80:53"
    pihole_admin_pass: "secure_password"

  tasks:

    - name: "Create pihole Podman Network"
      containers.podman.podman_network:
        name: "{{ pihole_net_name }}"
        state: "present"
      become: true

    ## Application

    - name: "Pull pihole-app Image"
      containers.podman.podman_image:
        name: "{{ pihole_app_image_name }}"
        tag: "{{ pihole_app_image_tag }}"
        state: "present"
      become: true

    - name: "Create pihole-app Service File"
      ansible.builtin.template:
        src: "container-pihole-app.service.j2"
        dest: "/etc/systemd/system/container-pihole-app.service"
        owner: "root"
        group: "root"
        mode: 0644
      become: true

    - name: "Start & Enable pihole-app Service"
      ansible.builtin.systemd:
        name: "container-pihole-app.service"
        state: "started"
        enabled: true
        daemon_reload: true
      become: true
...
As you can see, we are playing a bit with variables (because we can). Let me go through these.
  vars:
  	# name of the local podman network to isolate the traffic
    pihole_net_name: "pihole"

    # the fully qualified name of the container image
    pihole_app_image_name: "docker.io/pihole/pihole"

    # for testing we want to use the latest container image
    pihole_app_image_tag: "latest"

    # the pi-hole webserver will be available on port 80
    pihole_publish_http: "80"

    # dns udp and tcp via port 53 needs to be bound to a dedicated
    # ip address, to avoid conflicts with local resolvers like
    # systemd-resolvd or dnsmasq
    pihole_publish_dnsu: "192.168.178.80:53"
    pihole_publish_dnst: "192.168.178.80:53"

    # this is the password to open the admin settings on the web
    # interface
pihole_admin_pass: "secure_password"We also need a template, that provides our container as a system service. This concept was already done in the previous article with NTP. In case you want to know more about Podman and systemd, please consider reading the article "Podman - systemd container management".
For now, let's create the template.
[Unit]
Description=Podman container-pihole-app.service
Documentation=man:podman-generate-systemd(1)
Wants=network-online.target
After=network-online.target
RequiresMountsFor=%t/containers

[Service]
Environment=PODMAN_SYSTEMD_UNIT=%n
Restart=on-failure
TimeoutStopSec=70
Type=notify
NotifyAccess=all

ExecStartPre=/bin/rm -f %t/%n.ctr-id

ExecStart=/usr/bin/podman run \
	--cidfile=%t/%n.ctr-id \
	--cgroups=no-conmon \
	--rm \
	--sdnotify=conmon \
	--replace \
	--publish {{ pihole_publish_http }}:80/tcp \
	--publish {{ pihole_publish_dnsu }}:53/tcp \
	--publish {{ pihole_publish_dnst }}:53/udp \
	--detach \
	--tty \
	--label "io.containers.autoupdate=registry" \
	--volume pihole-app-conf:/etc/pihole/:Z \
	--volume pihole-app-dns:/etc/dnsmasq.d/:Z \
	--network=pihole \
	--env "WEBPASSWORD={{ pihole_admin_pass }}" \
	--env "DNSMASQ_LISTENING=all" \
	--name=pihole-app \
	{{ pihole_app_image_name }}:{{ pihole_app_image_tag }}

ExecStop=/usr/bin/podman stop \
	--ignore \
	--cidfile=%t/%n.ctr-id

ExecStopPost=/usr/bin/podman rm \
	--force \
	--ignore \
	--cidfile=%t/%n.ctr-id

[Install]
WantedBy=default.target
That's already it. We can run our playbook and hope that everything works (crossing fingers).
# Run the playbook
$ ansible-playbook -i IP_ADDRESS, -u USER -k -K ansible/playbooks/deploy_pihole_container.yml
And that should be it. You can also log in to the home server and check via systemd if everything is up.
# Check if the service is running
$ systemctl status container-pihole-app.service

# Check if the container is really running
$ podman ps -a
Setup 2
If you really want to have a look at DHCP + DNS via Pi-hole, you will need to run the container with --network=host, since DHCP works on broadcast only. Most likely this will conflict with local DNS resolvers, and you need to take care of these, too.
Furthermore, please read the Pi-hole articles very thoroughly.
 pi-hole
Test
After the deployment, you can test the configuration from any other machine in your network. The below commands can be used on a Mac or Linux device.
# Test DNS resolving with dig
$ dig @HOME_SERVER_IP_ADDRESS example.com

...
;; ANSWER SECTION:
example.com.		20404	IN	A	93.184.216.34
...

# Test DNS resolving with nslookup
$ nslookup example.com HOME_SERVER_IP_ADDRESS

...
Name:	example.com
Address: 93.184.216.34
...
If this is working well, you can continue with the configuration of Pi-hole.
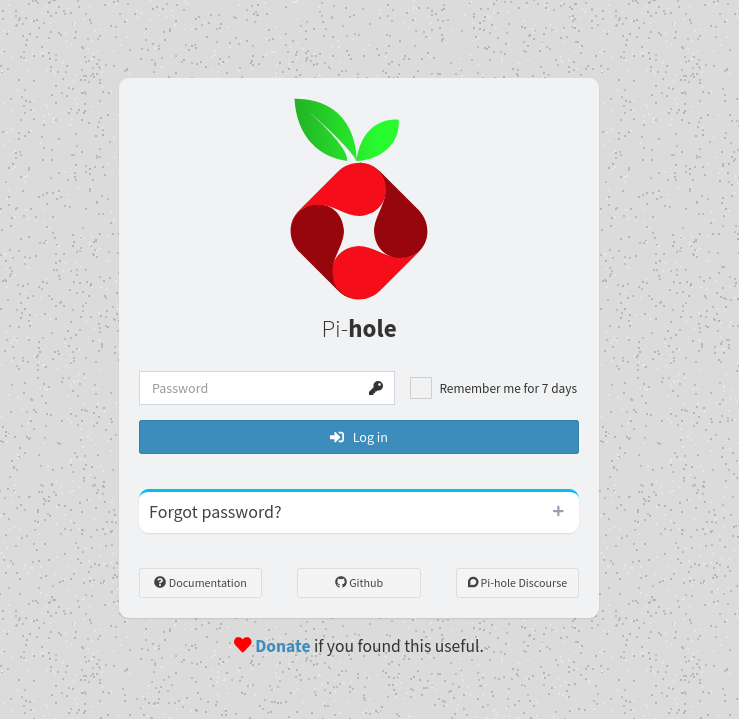
Configuration
Configuring Pi-hole can be done with the web interface. Point your browser to http://HOME_SERVER and you should be prompted with a login. Enter your chosen password from the above setup step. You should see the initial configuration screen.
Here you can find all the settings you might like:
- configure your own domain records
- configure your upstream DNS resolver (including a cool list)
- configure the DHCP server (if you know what you are doing)
I recommend to start with the basics and slowly dig more into it.
Network Changes
To make your DNS, NTP (optionally DHCP) setup work in your entire network, you need to perform some more steps in your local network.
Router
After setting up, testing and configuring your Pi-hole container, you need to adjust some settings on your router to promote the new DNS server to your network. Alternatively, you can configure a single client, as described in the following section.
Search for the DHCP settings in your router. In my case, the setting is hidden in Home -> Network -> Settings -> DHCP -> local DNS server.
Edit this setting, so it points to your new DNS server (aka home server)
After this edit, you should monitor your network for at least 24h very closely. Many clients will not see these updates on the same day, but will only update them when re-connected (got a new address via DHCP).
Since this topic is completely different for each router, the Pi-hole community started to document these.
Clients
If you just want to re-configure a single client, you can do this without touching your router. Windows, macOS, and Linux support the usage of a dedicated DNS server. But, this can also lead to weird situations. If you configure a device manually and carry it over to a new network, you might need to touch it again.
If you are using Fedora as your workstation, you might be lucky.
Open "Settings" aka "GNOME Settings" and look for your wired connections in the "Network" panel and for wireless connections in your "Wi-Fi" panel. After opening the existing you connection, you will find a dialog similar to the screenshot below.
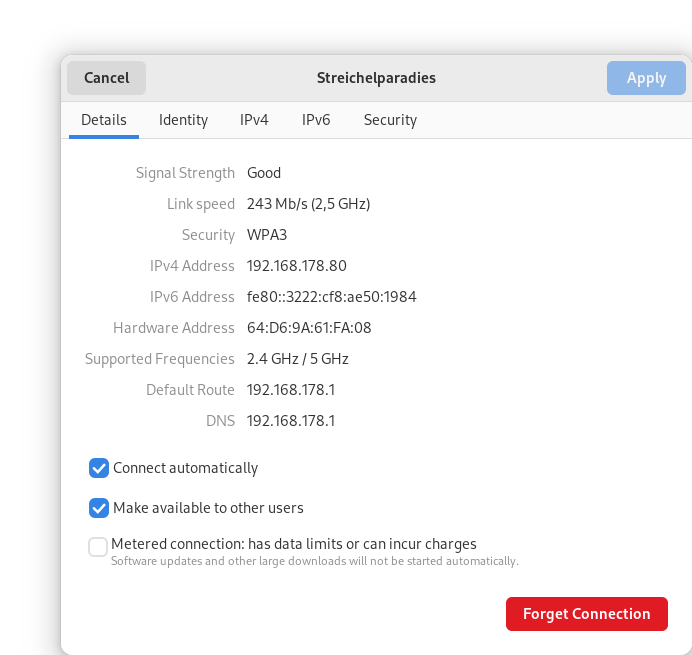
In the IPv4 and IPv6 tab, you are able to configure your own DNS server.
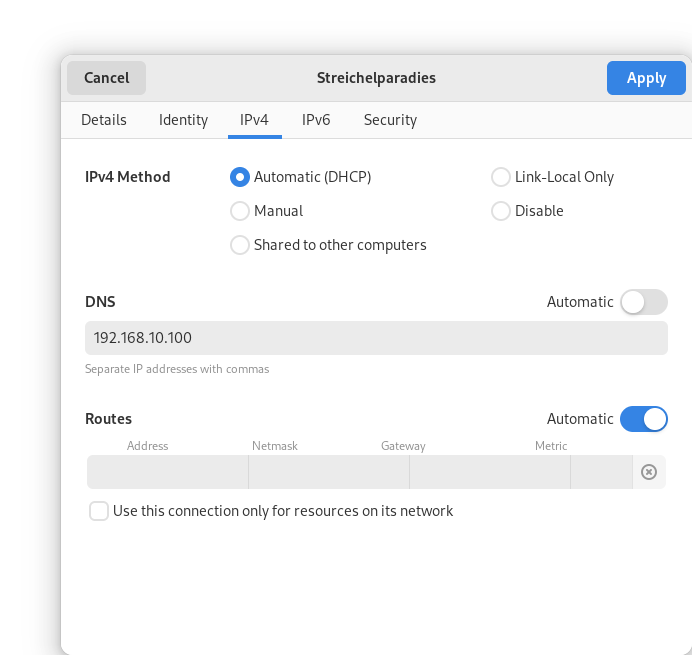
I have entered my home server address here and marked that DNS should not be automatic. Hitting apply will save the changes and they will be used immediately.
Repository & Code
As always, the code is made public in my fedora_homeserver repository.
dschier-wtdI am also creating a collection for such deployments, which is under heavy development. Ultimately, it will replace most of the container deployment code in my personal home server.
whiletruedoioDocs & Links
Lastly, let me provide some useful links, that might be helpful.

https://www.cloudflare.com/learning/dns/what-is-dns/

Conclusion
As you might have recognized, the Fedora Home Server articles took a bit longer. Doing these network things right and providing enough background information to get started was my goal. Doing this right took some time. I really hope, that the articles help you to play more with your home server.
Now, let's have a look at the coming articles, where we will deploy even more things with Podman and also give k3s a brief try.
Continue
You can follow this series with the next article, if you like.
 Daniel Schier


