Fedora - Home Server (Time, DHCP, DNS Server 1/2)
Phew, that took a while to get right. I don't want to waste any more of your valuable time. So, let's dig into the deployment of a time, DHCP and DNS server on our home server. Shall we?


Phew, that took a while to get right. I don't want to waste any more of your valuable time. So, let's dig into the deployment of a time, DHCP and DNS server on our home server. Shall we?
Intro
This series is explaining how we are setting up a home server from scratch. You can find links to the previous articles below.
- Intro & Concept
- Hardware & OS
- Automation
- Management
- Virtualization
- Container
- Time, DHCP, DNS Server
- Git Server
- File, Calendar, Contact Sync
- Application Dashboard
This time, we will automate some deployments. Let's go! :)
Time Server
A time-server is a service that provides a valid time source for network devices. Very often this service is provided by a router or consumed from a cloud service. Hosting this on our own has some cool benefits:
- less communication to cloud services
- devices in the network get the time from the same source
- learning new things about containers and UDP
- optionally using GPS as time source
Concept
Time-servers like NTP or chrony are pretty easy to configure.
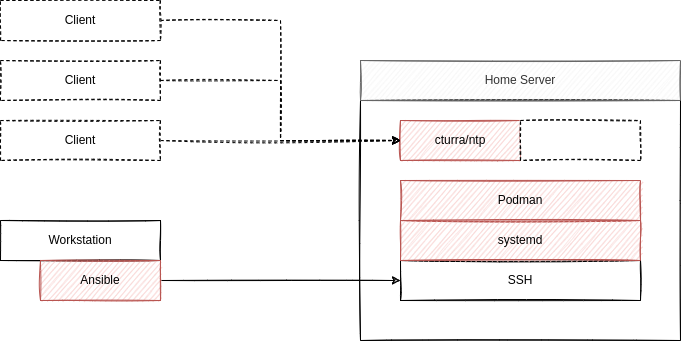
We will use a quite popular container from cturra and deploy it via Podman. It provides chrony in an Alpine Linux image. With <6 MB, it's also very small. Lastly, we will automate the setup via Ansible (as always) and control the container via systemd.
This will result in an automatically updated NTP server, that will just do its job.
Deploy
For the deployment, we will create a new playbook as part of our repository. We already deployed Podman in the "Fedora - Home Server (Container)" article.
This time, we will create a playbook to create a systemd unit file, similar to the ones explained in "Podman - systemd container management" article.
Just create a new playbook deploy_ntp_container.yml with the below content.
---
# ansible/playbooks/deploy_ntp_container.yml

- name: "Deploy NTP Container"
  hosts: "all"

  handlers:

    - name: "Restart container-ntp Service"
      ansible.builtin.systemd:
        name: "container-ntp.service"
        state: "restarted"
        daemon_reload: true
      become: true

  tasks:

    - name: "Create container-ntp Service File"
      ansible.builtin.template:
        src: "container-ntp.service.j2"
        dest: "/etc/systemd/system/container-ntp.service"
        owner: "root"
        group: "root"
        mode: 0644
      become: true
      notify:
        - "Restart container-ntp Service"

    - name: "Start & Enable container-ntp Service"
      ansible.builtin.systemd:
        name: "container-ntp.service"
        state: "started"
        enabled: true
        daemon_reload: true
      become: true
...
The above playbook will create a new systemd service unit, start and enable the service, but will also take care if something changed and restart the service.
But... there is something missing. We have to provide a template for our service file. Let's create this in the templates directory, too.
# container-ntp.service

[Unit]
Description=Podman container-ntp.service
Documentation=man:podman-generate-systemd(1)
Wants=network-online.target
After=network-online.target
RequiresMountsFor=%t/containers

[Service]
Environment=PODMAN_SYSTEMD_UNIT=%n
Restart=on-failure
TimeoutStopSec=70
ExecStartPre=/bin/rm -f %t/%n.ctr-id
ExecStart=/usr/bin/podman run \
  --cidfile=%t/%n.ctr-id \
  --cgroups=no-conmon \
  --rm \
  --sdnotify=conmon \
  --replace \
  --detach \
  --tty \
  --publish=123:123/udp \
  --replace \
  --read-only \
  --tmpfs=/etc/chrony:rw,mode=1750 \
  --tmpfs=/run/chrony:rw,mode=1750 \
  --tmpfs=/var/lib/chrony:rw,mode=1750 \
  --env NTP_SERVERS="0.pool.ntp.org,1.pool.ntp.org,2.pool.ntp.org" \
  --io.containers.autoupdate="registry" \
  --name=ntp \
  docker.io/cturra/ntp
ExecStop=/usr/bin/podman stop \
  --ignore \
  --cidfile=%t/%n.ctr-id
ExecStopPost=/usr/bin/podman rm \
  --force \
  --ignore \
  --cidfile=%t/%n.ctr-id
Type=notify
NotifyAccess=all

[Install]
WantedBy=default.target
The above file is very similar to the one shown from the "Podman - systemd container management" article. We also added all security options from the documentation provided from the container image maintainer. As the time-servers, I have opted for the ones provided from the NTP pool, but you can customize these to your liking.
Lastly, you can find the auto-update label in the configuration, as described in the article "Podman - Auto Updates". This will ensure that your container is updated and new patches and security fixes are applied automatically.
Test
From our home server, we can check the current state of the deployment in multiple ways.
# Check if the service is running
$ systemctl status container-ntp.service

# Check if the container is really running
$ podman ps -a

# Check the used time source
$ sudo podman exec ntp chronyc sources

# Check the diff for the next timeserver
$ podman exec ntp chronyc tracking
But, we can also test the server from our workstation.
# Test the new server
$ chronyd -Q "server <IP-ADDRESS> iburst"

# or use ntpdate instead
$ ntpdate -q <IP-ADDRESS>
Repository and Code
As always, I have updated the code in the related repository over at GitHub. Please feel free to check it out, in case you need some additional help or support.
 dschier-wtd
Docs & Links
I have linked some articles already, but let's summarize the most important ones again.


Conclusion
For now, we have a little NTP server, which can be used from our clients. Sure, one may configure these manually, but in the next article, we will promote this server via DHCP. We will also have a look at DNS and how we can build our own DNS cache/forwarder.
Are there any other services you are interested in? Do you already use your home server with other things? What do you think about DNS and NTP caching services? Please let me know! I would also happily hear your feedback about this series so far.
Continue
Please check out the next article of this series.
 Daniel Schier


