Fedora - Home Server (Automation)
In the Fedora - Home Server series, we are looking into setting up and automating our Home Server deployment. The last two articles introduced you to the concept, hardware and operating system. This time, we will set up our automation and do the first tasks.


In the Fedora - Home Server series, we are looking into setting up and automating our Home Server deployment. The last two articles introduced you to the concept, hardware and operating system. This time, we will set up our automation and do the first tasks.
Intro
The series will explain what we will do and how we are doing it. We will start with the basics and end up with a usable home & lab environment. The below list will be updated and linked, so you can follow along.
- Intro & Concept
- Hardware & OS
- Automation
- Management
- Virtualization
- Container
- Time, DHCP, DNS Server
- Git Server
- File, Calendar, Contact Sync
- Application Dashboard
Afterwards, you will be able to deploy more services that might be helpful for you. You can also adapt some other articles, that I will publish in parallel and afterwards or that are already published.
It's just a lab and home server environment, that can be used however you want. ;)
Project Repository
From now on, we will write everything in a Git repository. If you don't have your own Git server, you may want to check out GitHub, GitLab or Codeberg. All of them provide the functionality, we need.
I am publishing all the code we require in my personal "fedora-homeserver" repository on GitHub. You can either create your own, fork mine, or just adapt it. Be aware, that this repository will change over time and depending on the date you are reading this article, some things may have changed already.
For this guide, I will not use content from my repository, but create something with you.
Automating the OS Installation
In the last article, I explained how one can install Fedora Server interactively. But, there is also an option to automate bare metal installations. This is known as "Kickstart" and works for Fedora, RHEL, CentOS and all derivates.
In general, you have to prepare a Kickstart configuration and make it available to the installer. This can be done in multiple ways. The easiest is, to put it on some kind of web server. I have prepared a very basic configuration in my personal Fedora Homeserver Repository.
If you want to play with Kickstart, I suggest starting with my example in a Virtual Machine. Just start a VM with a Fedora ISO, similar to an interactive setup. During the boot process, you will get the option to choose from different options. You need to interrupt this and edit the first boot entry (Install Fedora 35), like shown below. Basically, you need to append inst.ks=https://url.example.com/path/to/kickstart.cfg. To use my example, this would be inst.ks=https://raw.githubusercontent.com/dschier-wtd/main/kickstart/base_ks.cfg.
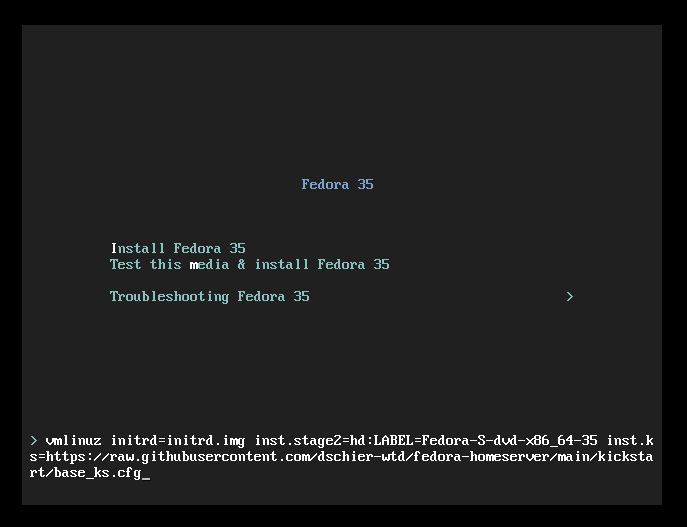
Afterwards, the installer will start as usual, but you will not be granted with a graohical environment, but with the automated installer instead.
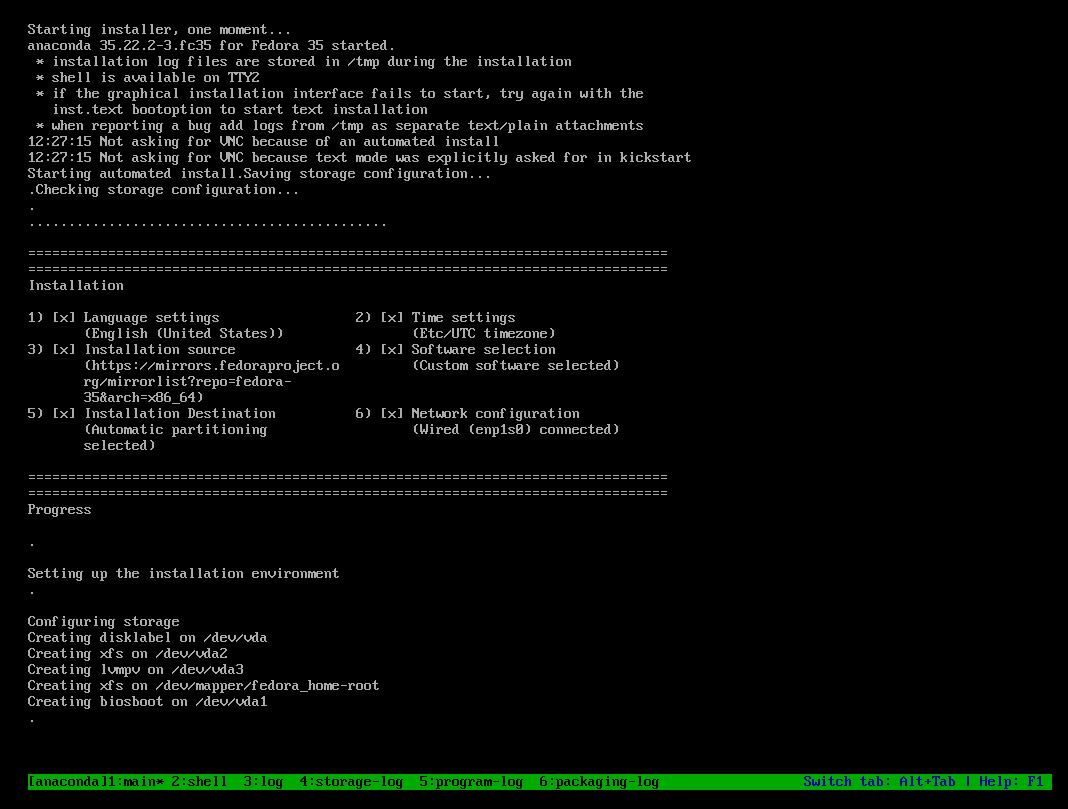
The machine will reboot at the end, and you can log in with the default credentials user: admin, password: password.
In one of the next articles, I will provide a proper "Kickstart - Getting Started" guide with more details. :)
Automating the Configuration
Automating the configuration of Fedora Linux can be done in many ways. Since, I have already written a couple of articles about Ansible, we will use the same. We will automate basically every future step of our setup with Ansible, so we can reproduce the setup at any time in the future.
Diagram
I assume, that you are having a workstation where Ansible is/can be installed and the prepared (OS installation done) home server. We want to use our workstation to automate the setup for now.
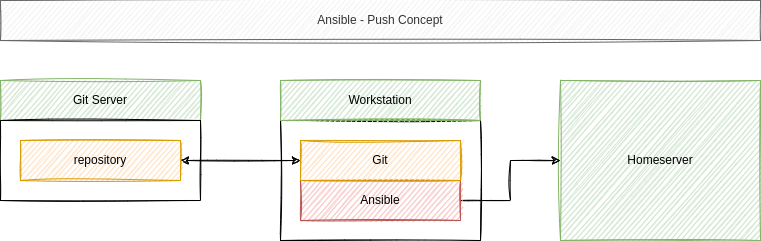
The git repository is optional, but strongly recommended. So, let's set up the above diagram and add some tasks to our automation, shall we?
Setup Ansible
The first thing, you need to do: Install Ansible on your workstation. For a Linux machine, this is pretty easy and one can boil it down to the below snippet.
# Create a virtualenv
$ python3 -m venv ~/.venv-ansible

# Activate the virtualenv
$ source ~/.venv-ansible/bin/activate

# Install Ansible
$ pip install ansible

# Deactivate the virtualenv (after your work)
$ deactivate
If you haven't worked with Ansible at all, and you need some guidance beforehand, I recommend checking out the "Ansible - Getting Started" and "Ansible - Playbooks" article. In case you want to automate your workstation setup, you can also check out "Ansible - Linux Workstation Management".
For now, let's continue with our Project.
Project Directory/Repository
For now, we will need a very simple directory layout, but this will grow over time, and we will add more to it in the upcoming articles. Let's create this simple layout.
# Create the directories
$ mkdir -p fedora-homeserver/ansible/playbooks/

# Jump into our new directory
$ cd fedora-homeserver/

# Create some empty files
$ touch ansible/playbooks/configure.yml
$ touch ansible/playbooks/update.yml
$ touch ansible/manifest.yml
$ touch ansible/requirements.yml
$ touch README.md
That's already it. We are having two playbooks (configure.yml, update.yml), a README, where you can document your work and a manifest.yml, which will be used later for another way of configuration. The requirements.yml will be used to maintain 3rd party collections and roles, which may be needed later on.
All of these files will play together like this:
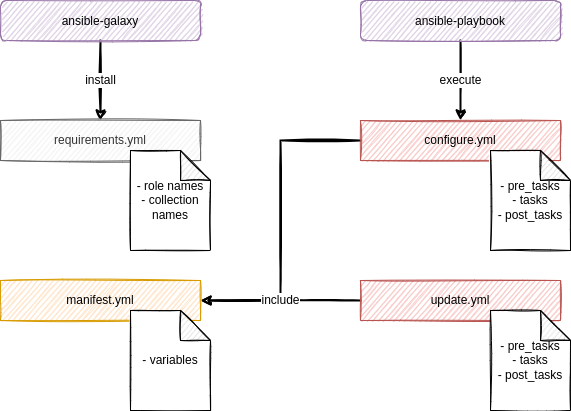
It is recommended to maintain such a project directory in Git, since one can review the work and roll back and forth between different working states.
# Initialize the repository
$ git init

# Add files to the default branch
$ git add .

# Commit the work
$ git commit -m "Initial commit"
If you never worked with Git, you can check out the articles that are dedicated to the usage of Git: "Git - Getting Started" and "Git - Next Steps".
Minimal Server playbook
We will start low with our very first playbook. So let's do some simple work.
Boilerplate/Skeleton
First, we need to prepare our "configure.yml" playbook. This playbook should take care of the configuration of our server. A very simple boilerplate is need to include the "manifest.yml".
---
# ansible/playbooks/configure.yml

- name: "Configure Homeserver"
  hosts: "all"

  vars_files:
    - "../manifest.yml"

  tasks:

...There is one thing, that wasn't addressed in a previous article. The vars_files statement can be used to include variables from basically any other YAML file.
This is very handy, if you are addressing a pre-defined set of hosts or a single host. It makes it also very easy to document possible variables, since you can provide an example file, which can be copied from others and reproduce your setup.
Configure hostname
Enough of the boilerplate and theory, let's do something useful. First, we want to configure our hostname. We can do this with a simple task, and also provide an option to change it easily in via the "manifest.yml".
Add the below task to the "configure.yml":
...snip...

  tasks:

    - name: "Configure hostname"
      ansible.builtin.hostname:
        name: "{{ system.hostname }}"
      become: true
...As you can see, we are using a system.hostname variable. We need to configure it.
---
# ansible/manifest.yaml

system:
hostname: "yourhost.yourdomain"That's already it. You can try to execute the playbook with a simple command.
# Execute playbook
$ ansible-playbook -i IP_ADDRESS, -u USER -k -K ansible/playbooks/configure.yml
For now, you need to provide some additional parameters, but we will simplify this over time. Let me explain what the variables mean:
# -i IP_ADDRESS,

This is an inline inventory and can be used instead of an inventory file. The comma at the end is important, though.

# -u USER

This defines the user, that is used to login to the home server. This can be your user from the previous article or the one created with the above Kickstart file.

# -k -K

The small "-k" asks for the SSH password, the "-K" requests the sudo passwords. In general it is the same and ansible is aware of this, as you can see in the prompt when executing.You can remember the above command, we will need it later on. ;)
Configure timezone
Configuring the timezone and starting the NTP client (chronyd) to pull a proper time from the network should be mandatory, too. The playbook will be extended with the below snippet.
...snip...

    - name: "Configure timezone"
      community.general.timezone:
        name: "{{ system.timezone }}"
      become: true

    - name: "Manage chrony Packages"
      ansible.builtin.package:
        name: "chrony"
        state: "present"
      become: true

    - name: "Manage chrony Services"
      ansible.builtin.service:
        name: "chronyd.service"
        state: "started"
        enabled: true
      become: true
...As you can see, we are using a new collection "community.general", which may not be installed already. We can add it to our "requirements.yml" for documentation and to install it.
---
# ansible/requirements.yml

collections:
- name: "community.general"Installing the collections is pretty easy, too.
# Install collections from a requirements.yml
$ ansible-galaxy collection install -r ansible/requirements.yml
This should take care of the needed collection to run the timezone task. Lastly, we need to add our new variable system.timezone to the "manifest.yml"
---
# ansible/manifest.yaml

system:
  hostname: "yourhost.yourdomain"
timezone: "Etc/UTC"I have chosen "Etc/UTC", which is my default for all servers, to avoid Daylight Saving issues and have consistent log files.
Install CLI packages
Very often, we also need some additional CLI packages for debugging or comfort. This is so easy, I will just present the additional snippet for the playbook.
...snip...

    - name: "Manage cli Packages"
      ansible.builtin.package:
        name:
          - "bash"
          - "bash-completion"
          - "tmux"
          - "wget"
          - "curl"
        state: "present"
      become: true
...That's already it.
Install and enable tuned
Lastly, we also want to enable tuned, a daemon to manage power profiles (mostly for servers). We will see more of it in the next chapter, but it has auto-detection features, and we don't need to configure it in any special way for now.
...snip...

    - name: "Manage tuned Packages"
      ansible.builtin.package:
        name: "tuned"
        state: "present"
      become: true

    - name: "Manage tuned Service"
      ansible.builtin.service:
        name: "tuned.service"
        state: "started"
        enabled: true
      become: true
...Wrap Up
The complete playbook, after adding all the above parts, will look something like this:
---
# ansible playbook for github.com/dschier-wtd/fedora-homeserver

- name: "Configure Fedora Homeserver"
  hosts: "all"

  vars_files:
    - "../manifest.yml"

  tasks:

    - name: "Configure hostname"
      ansible.builtin.hostname:
        name: "{{ system.hostname }}"
      become: true

    - name: "Configure timezone"
      community.general.timezone:
        name: "{{ system.timezone }}"
      become: true

    - name: "Manage chrony Packages"
      ansible.builtin.package:
        name: "chrony"
        state: "present"
      become: true

    - name: "Manage chrony Services"
      ansible.builtin.service:
        name: "chronyd.service"
        state: "started"
        enabled: true
      become: true

    - name: "Manage cli Packages"
      ansible.builtin.package:
        name:
          - "bash"
          - "bash-completion"
          - "tmux"
          - "wget"
          - "curl"
        state: "present"
      become: true

    - name: "Manage tuned Packages"
      ansible.builtin.package:
        name: "tuned"
        state: "present"
      become: true

    - name: "Manage tuned Service"
      ansible.builtin.service:
        name: "tuned.service"
        state: "started"
        enabled: true
      become: true
...Running the playbook
Running the playbook is quite simple, as already stated above. But there are some options, we should check out, too.
# Syntax Check the playbook
# To look for syntax errors without executing the playbook
$ ansible-playbook --syntax-check ansible/playbooks/configure.yml

# Dry-Run the playbook
# To check what will be changed
ansible-playbook -i IP_ADDRESS, -u USER -k -K --check ansible/playbooks/configure.yml

# Run the playbook
# To really do the work
ansible-playbook -i IP_ADDRESS, -u USER -k -K ansible/playbooks/configure.yml
Update Server playbook
At the very end, I will introduce a very simple way to update your server and take care of reboots. Since we are having the machine at home, you don't need to be super careful about updates, but it is highly recommended to perform them on a regular basis.
---
# ansible/playbooks/update.yml

- name: "Update homeserver"
  hosts: "all"

  vars_files:
    - "../manifest.yml"

  handlers:

    - name: "Reboot system"
      ansible.builtin.reboot:
        reboot_timeout: 1800
      become: true

  tasks:

    - name: "Manage system Update"
      ansible.builtin.package:
        name: "*"
        state: "latest"
      become: true
      notify:
        - "Reboot system"
...This short playbook also demonstrates the usage of "handlers". Handlers are a way to trigger actions, based on a notification/event. In our case, the reboot task will be executed, only if the update task reports a change.
I am doing updates approximately every month, but at least every 3 months. With the simple playbook, it is basically "fire and forget" and can be done when watching a TV show or playing some Minecraft or so.
Docs & Links
Below, you can find additional resources to learn more about Kickstart and Ansible.


 dschier-wtd
Conclusion
Phew, that was a ride. 2000 words later and lots of examples later, we are having a nice little home server, which can be automated. In the next articles, we will add all kinds of workload to the machine and of course, all of it will be automated.
What do you want to automate? Which workload are you missing?
Continue
Please check out the next article of this series.