Fedora - Home Server (Virtualization 2/2)
In the previous article, we introduced virtualization to our home server. This allows us to start virtual machines with different operating systems. The combination of libvirt, KVM and Cockpit also allows us to create virtual machines with a graphical frontend.


In the previous article, we introduced virtualization to our home server. This allows us to start virtual machines with different operating systems. The combination of libvirt, KVM and Cockpit also allows us to create virtual machines with a graphical frontend.
But, why don't we automate the setup of virtual machines, too? So, let's level up our Ansible automation game.
Intro
This series is explaining how we are setting up a home server from scratch. The previous articles are addressing the basic setup, including some management.
- Intro & Concept
- Hardware & OS
- Automation
- Management
- Virtualization
- Container
- Time, DHCP, DNS Server
- Git Server
- File, Calendar, Contact Sync
- Application Dashboard
This is the second part, taking care of virtualization.
Concept
Under the hood, we want to use so called cloud-images, Cloud-Init and Ansible to automate the deployment. For now, I am ok to have an Ansible Playbook that will create a new machine, start it and that's it.
We can use Ansible to talk to libvirt/KVM for the heavy work. For the first boot automation, I will opt for Cloud-Init, which makes it quite easy to set up new machines.
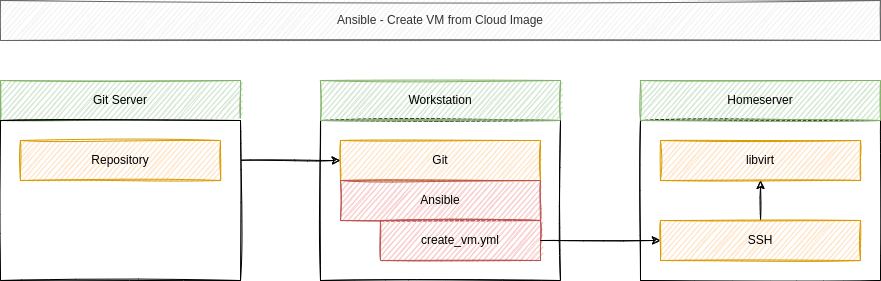
In the end, we can create new machines from our workstation. For convenience, we will also introduce some prompts, to tell the Ansible Playbook how many CPU, Memory or Disk is needed.
Automation
Ok, enough of the preface, let's automate! The next chapters we will:
- Download the cloud base image
- Create the Cloud-Init configuration
- Create the VM
I will do this with a Fedora Cloud Image, but it can be reproduced with the generic Ubuntu or CentOS Stream Cloud images easily.
Downloading the image
For convenience, I recommend writing a new create_vm.yml playbook. You can move some parts of it afterwards. For now, it will demonstrate the complete process, quite conveniently.
The first thing we want to do is "Downloading the image", but we also need to create a proper directory for these base images.
We just need to create a new playbook with the below content.
---
- name: "Create Virtual Machine"
  hosts: "all"
  gather_facts: false

  vars:

    # libvirt paths
    libvirt_directory: "/var/lib/libvirt"
    libvirt_image_directory: "{{ libvirt_directory }}/images"
    libvirt_base_directory: "{{ libvirt_directory }}/base"
    libvirt_boot_directory: "{{ libvirt_directory }}/boot"

    # Fedora Cloud Base Image
    fedora_cloud_image_name: "Fedora-Cloud-Base-35-1.2.x86_64.qcow2"
    fedora_cloud_image_url: "https://download.fedoraproject.org/pub/fedora/\
                              linux/releases/35/Cloud/x86_64/images/\
                              {{ fedora_cloud_image_name }}"

    # Variables for our Virtual Machine
    vm_image: "{{ fedora_cloud_image_name }}"
    vm_name: "test01"
    vm_disk: "10"
    vm_vcpu: "2"
    vm_vram: "1024"
    vm_vnet: "bridge"

  tasks:

    # Download Images

    - name: "Fetch existing VMs"
      community.libvirt.virt:
        command: "list_vms"
      register: "r_existing_vms"
      changed_when: false
      become: true

    - name: "Manage base image Directory"
      ansible.builtin.file:
        path: "{{ libvirt_base_directory }}"
        state: "directory"
        owner: "root"
        group: "root"
        mode: 0755
      become: true

    - name: "Download Fedora Cloud Base Image"
      ansible.builtin.get_url:
        url: "{{ fedora_cloud_image_url }}"
        dest: "{{ libvirt_base_directory }}"
        owner: "root"
        group: "root"
        mode: 0644
      become: true
      when:
        - "vm_name not in r_existing_vms.list_vms"

...SNIP...As you can see, I have also added a ton of variables. We will need all of them for the upcoming tasks. For now, we will ensure that the libvirt_base_directory is existing, and we will download the Fedora Cloud Base Image.
Furthermore, we will check if the already exists, before doing something that may be harmful.
Creating a Cloud-Init configuration
Ok, an image is downloaded and the playbook is prepared. So far, so easy. Now we need to address the automatic configuration. Today, I will not dig into too many details, but provide a followup article about Cloud-Init.
For now, Cloud-Init is a technology that can be consumed from most cloud images and autoconfigure a machine. Therefore, one has to prepare a "user-data" and "meta-data" file and put both in an ISO.
Yes, we can automate this configuration. Therefore, we need to add some more tasks to our playbook.
...SNIP...
    # Create Cloud Init Config

    - name: "Manage boot Directory"
      ansible.builtin.file:
        path: "{{ libvirt_boot_directory }}/{{ vm_name }}"
        state: "directory"
        owner: "root"
        group: "root"
        mode: 0755
      become: true

    - name: "Create cloud-init user-data"
      ansible.builtin.template:
        src: "user-data.j2"
        dest: "{{ libvirt_boot_directory }}/{{ vm_name }}/user-data"
        owner: "root"
        group: "root"
        mode: 0644
      become: true
      when:
        - "vm_name not in r_existing_vms.list_vms"

    - name: "Create cloud-init meta-data"
      ansible.builtin.template:
        src: "meta-data.j2"
        dest: "{{ libvirt_boot_directory }}/{{ vm_name }}/meta-data"
        owner: "root"
        group: "root"
        mode: 0644
      become: true
      when:
        - "vm_name not in r_existing_vms.list_vms"

    - name: "Create cloud-init Image"
      ansible.builtin.command:
        cmd: "genisoimage
              -output cloud-init.iso
              -volid cidata
              -joliet
              -rock
              user-data
              meta-data"
        chdir: "{{ libvirt_boot_directory }}/{{ vm_name }}/"
      become: true
      when:
        - "vm_name not in r_existing_vms.list_vms"
...SNIP...In the second and third task, we are using the template module. Therefore, we have to create the two templates.
#cloud-config

# host
preserve_hostname: false
hostname: "{{ vm_name }}"

timezone: "Etc/UTC"

# user
disable_root: true
ssh_pwauth: true
no_ssh_fingerprints: true

system_info:
  default_user:
    name: admin
    home: /home/admin
    lock_passwd: false
    plain_text_passwd: password

ssh:
  emit_keys_to_console: false

# packages
package_upgrade: true
packages:
  - qemu-guest-agent
package_reboot_if_required: true

# Commands
runcmd:
  - systemctl disable cloud-init.service
The meta-data.j2 is just an empty file.
If you run this, you will end up with the two files and a cloud-init.iso in /var/lib/libvirt/boot/test01/. This is the ISO we want for the next step.
You may guess (from the template above), that the Cloud-Init configuration is not too sophisticated. We create a user admin with the password password and update the machine. Finally, we will disable the Cloud-Init service, since we don't want to reconfigure the machine on every reboot.
Creating the VM
Finally, we can create a VM. We need to add some more jobs to our playbook. So, one more time, please.
...SNIP...
    # Create VM

    - name: "Create VM Disk"
      ansible.builtin.command:
        cmd: "qemu-img create
              -f qcow2
              -b {{ libvirt_base_directory }}/{{ vm_image }}
              -F qcow2
              {{ libvirt_image_directory }}/{{ vm_name }}.qcow2 {{ vm_disk }}G"
        creates: "{{ libvirt_image_directory }}/{{ vm_name }}.qcow2"
      become: true
      when:
        - "vm_name not in r_existing_vms.list_vms"

    - name: "Define VM"
      community.libvirt.virt:
        command: "define"
        xml: "{{ lookup('template', 'kvm_template_efi.xml.j2') }}"
        uri: "qemu:///system"
      become: true
      when:
        - "vm_name not in r_existing_vms.list_vms"

    - name: "Start & Autostart VM"
      community.libvirt.virt:
        name: "{{ vm_name }}"
        state: "running"
        autostart: "true"
        uri: "qemu:///system"
      become: true
...
Oh, there is another template. Libvirt works with XML configurations which are used to define which disk should be booted, which device is available and much more. I have prepared the below snippet, which will create machines that boot with EFI and SecureBoot enabled.
<domain type='kvm'>
  <name>{{ vm_name }}</name>
  <memory unit='MiB'>{{ vm_vram }}</memory>
  <vcpu placement='static'>{{ vm_vcpu }}</vcpu>
  <os firmware='efi'>
    <type machine='q35'>hvm</type>
    <loader secure='yes'/>
    <boot dev='hd'/>
  </os>
  <features>
    <acpi/>
    <apic/>
  </features>
  <cpu mode='host-model' check='none'/>
  <devices>
    <emulator>/usr/bin/qemu-system-x86_64</emulator>
    <disk type='file' device='disk'>
      <driver name='qemu' type='qcow2'/>
      <source file='{{ libvirt_image_directory }}/{{ vm_name }}.qcow2' index='2'/>
      <backingStore type='file' index='3'>
        <format type='qcow2'/>
        <source file='{{ libvirt_base_directory }}/{{ vm_image }}' index='1'/>
        <backingStore/>
      </backingStore>
      <target dev='vda' bus='virtio'/>
    </disk>
    <disk type='file' device='cdrom'>
      <driver name='qemu' type='raw'/>
      <source file='/var/lib/libvirt/boot/{{ vm_name }}/cloud-init.iso' index='1'/>
      <backingStore/>
      <target dev='sda' bus='sata'/>
      <readonly/>
    </disk>
    <interface type='network'>
      <source network='{{ vm_vnet }}'/>
      <model type='virtio'/>
    </interface>
    <channel type='unix'>
      <target type='virtio' name='org.qemu.guest_agent.0'/>
      <address type='virtio-serial' controller='0' bus='0' port='1'/>
    </channel>
    <channel type='spicevmc'>
      <target type='virtio' name='com.redhat.spice.0'/>
      <address type='virtio-serial' controller='0' bus='0' port='2'/>
    </channel>
    <serial type='pty'>
        <target port='0'/>
    </serial>
    <console type='pty'>
      <target type='serial' port='0'/>
    </console>
    <input type='tablet' bus='virtio'/>
    <input type='mouse' bus='virtio'/>
    <input type='keyboard' bus='virtio'/>
    <graphics type='vnc' port='-1' autoport='yes' listen='127.0.0.1'>
      <listen type='address' address='127.0.0.1'/>
    </graphics>
    <graphics type='spice' autoport='yes' listen='127.0.0.1'>
      <listen type='address' address='127.0.0.1'/>
      <image compression='off'/>
    </graphics>
    <video>
      <model type='qxl' ram='65536' vram='65536' vgamem='16384' heads='1' primary='yes'/>
      <address type='pci' domain='0x0000' bus='0x00' slot='0x01' function='0x0'/>
    </video>
    <memballoon model='virtio'/>
    <rng model='virtio'>
      <backend model='random'>/dev/urandom</backend>
    </rng>
  </devices>
</domain>
If you look very closely in the above template, you can find our variables. As you can see, we identify the VM Name, CPU, Memory and Images here. We will also ensure that the "cloud-init.iso" is mounted and available.
There is something special with this configuration, too. Instead of just booting our base image, we are creating a new image which has the base image as "backingStore".
This is a pretty awesome feature, since our VM images are sharing this backing image and only the difference (new packages, changed configuration) will allocate disk space. A new VM can be as small as 2 MiB(!) with a backing store. Pretty cool, huh? :D
The first run
Now that everything is in place, we can run our playbook. If everything is fine, we will have a fresh Fedora VM with the name "test01" afterwards.
ansible-playbook -u admin -k -K -i IP_ADDRESS, ansible/playbooks/create_vm.ymlPhew, that was a lot. Or wasn't it? Anyway, we can improve this a bit.
Prompt for VM values
The playbook will work and if I want a new VM, I just need to edit the playbook and run it again. But... this is tedious. Ansible provides something to "prompt for values". If we use this, the playbook will ask us for the VM Name, CPU or Memory. So, let's refine our playbook.
We just need to remove the vm_ variables and write some prompts for the same.
The result will look something like this:
---
- name: "Create Virtual Machine"
  hosts: "all"
  gather_facts: false

  vars:

    libvirt_directory: "/var/lib/libvirt"
    libvirt_image_directory: "{{ libvirt_directory }}/images"
    libvirt_base_directory: "{{ libvirt_directory }}/base"
    libvirt_boot_directory: "{{ libvirt_directory }}/boot"

    fedora_cloud_image_name: "Fedora-Cloud-Base-35-1.2.x86_64.qcow2"
    fedora_cloud_image_url: "https://download.fedoraproject.org/pub/fedora/\
                              linux/releases/35/Cloud/x86_64/images/\
                              {{ fedora_cloud_image_name }}"

    vm_image: "{{ fedora_cloud_image_name }}"
    vm_vnet: "bridge"

  vars_prompt:

    - name: "vm_name"
      prompt: "VM Name"
      private: false

    - name: "vm_vcpu"
      prompt: "Virtual CPU Cores?"
      default: "2"
      private: false

    - name: "vm_vram"
      prompt: "Virtual RAM (MB)?"
      default: "1024"
      private: false

    - name: "vm_disk"
      prompt: "Disk Size (GB)?"
      default: "10"
      private: false

  tasks:

...SNIP...If you run the playbook now, you will get some interactive input to add the important things. This makes it pretty easy to create new virtual machines.
# Create a new VM
$ ansible-playbook -u admin -k -K -i home, --diff ansible/playbooks/create_vm.yml

VM Name: test02
Virtual CPU Cores? [2]: 4
Virtual RAM (MB)? [1024]: 2048
Disk Size (GB)? [10]: 20
I will elaborate on Ansible Prompts in another article, for sure.
And as always, you can find the up-to-date version of our work in the Fedora Homeserver Repository.
Docs & Links
This time we addressed lots of new topics. I will ensure to explain most of them in the upcoming articles. For now, here are some useful links, that may help you to get started.
 dschier-wtd


Conclusion
Yay, we can run virtual machines now. For me, this is super important for my Lab activity. Not everything can be tested in containers, and I needed a quick way to deploy machines.
We also learned tons of new stuff. Was there anything new for you? Which of the mentioned topics are you interested in? I would love to get your feedback.
Continue
Please check out the next article of this series.


